


Red Hat OpenShift Container Platform is a set of modular components and services built on top of Red Hat CoreOS and Kubernetes. RHOCP adds PaaS capabilities such as remote management, increased security, monitoring and auditing, application life-cycle management, and self-service interfaces for developers. An OpenShift cluster is a Kubernetes cluster that can be managed the same way, but using the management tools provided by OpenShift, such as the command-line interface or the web console. This allows for more productive workflows and makes common tasks much easier.
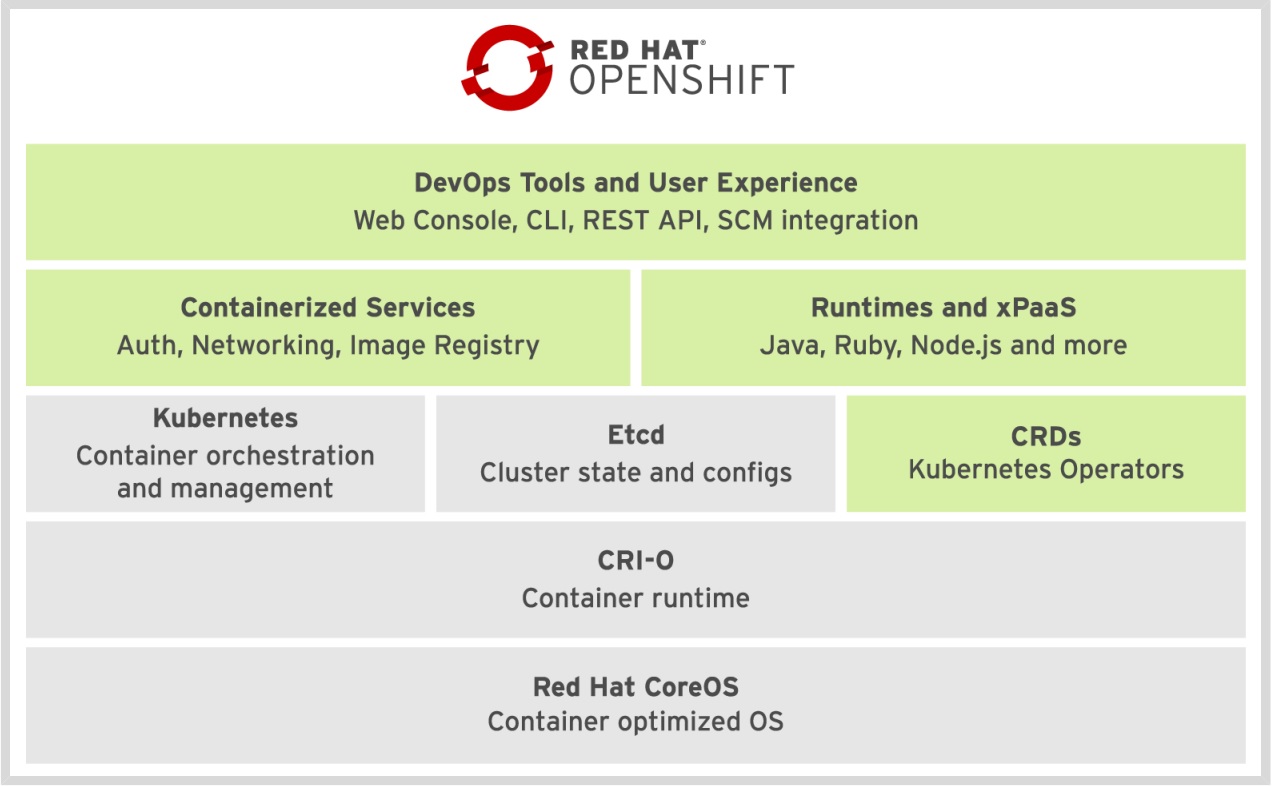
The following schema illustrates the OpenShift Container Platform stack.
The main method of interacting with an RHOCP cluster is using the oc command. The basic usage of the command is through its subcommands in the following syntax:
|
1 |
$ oc <command> |
Before interacting with a cluster, most operations require a logged-in user. The syntax to log in is shown below:
|
1 |
$ oc login <clusterUrl> |
Understanding Projects
- The Linux kernel provides namespaces to offer strict isolation between processes
- Kubernetes implements namespaces in a cluster environment
- To limit inter-namespace access
- To apply resource limitations on namespaces
- To delegate management tasks to users
- OpenShift implements Kubernetes namespaces as a vehicle to manage access to resources for users
- In OpenShift, namespaces are reserved for cluster-level admin access
- Users work with projects to store their resources
To list projects:
|
1 |
$ oc get projects |
To list name spaces:
|
1 |
$ oc get ns |
Understanding Applications
- After creating a project,
oc new-appcan be used to create an application - While creating an application, different Kubernetes resources are created
- Deployment or deploymentconfig: the application itself, including its cluster properties
- Replicationcontroller or replicaset: takes care of running pods in a scalable way, using multiple instances
- Pod: the actual instance of the application that typically runs one container
- Service: a load balancer that exposes access to the application
- Route: the resource that allows incoming traffic by exposing an FQDN
- When Source 2 Image (S21) is used, additional resources are used as well
This command gives everything which is available with new-app:
|
1 |
$ oc new-app -h | less |
Let’s create a nginx app:
|
1 2 3 4 5 6 7 8 9 10 11 12 |
$ oc new-app bitnami/nginx --> Found container image 80e927a (2 days old) from Docker Hub for "bitnami/nginx" * An image stream tag will be created as "nginx:latest" that will track this image --> Creating resources ... deployment.apps "nginx" created service "nginx" created --> Success Application is not exposed. You can expose services to the outside world by executing one or more of the commands below: 'oc expose service/nginx' Run 'oc status' to view your app. |
To show all resources currently running in this encvironment use:
|
1 |
$ oc get all |
To see imagestreams:
|
1 |
$ oc get imagestream |
Understanding Resources
- To run an application in OpenShift, different Kubernetes resources are used
- Each resource is defined in the API to offer specific functionality
- The API defines how resources connect to each other
- Many resources are used to define how a component in the cluster is running:
- Pods define how containers are started using images
- Services implement a load balancer to distribute incoming workload
- Routes define an FUN for accessing the application
- Resources are defined in the API
Monitoring Applications
- The Pod is the representation of the running processes
- To see process STDOUT, use
oc logs podname - To see how the Pods (as well as other resources) are created in the cluster, use
oc describe - To see all status information about the Pods, use
oc get pod podname -o yaml
Openshift has awesome command line completion:
|
1 2 3 4 5 6 7 8 9 10 11 12 13 |
$ oc completion -h ... ## Load the oc completion code for bash into the current shell <strong>source <(oc completion bash)</strong> ## Write bash completion code to a file and source it from .bash_profile oc completion bash > ~/.kube/completion.bash.inc printf " # Kubectl shell completion source '$HOME/.kube/completion.bash.inc' " >> $HOME/.bash_profile source $HOME/.bash_profile ... |
Let’s enable this feature:
|
1 |
$ source <(oc completion bash) |
And we can use it:
|
1 2 3 4 5 6 7 8 9 10 11 12 13 14 |
$ oc <tab><tab> adm (Tools for managing a cluster) logout (End the current server session) annotate (Update the annotations on a resource) logs (Print the logs for a container in a pod) api-resources (Print the supported API resources on the server) new-app (Create a new application) api-versions (Print the supported API versions on the server, in the form of "group/version") new-build (Create a new build configuration) apply (Apply a configuration to a resource by file name or stdin) new-project (Request a new project) attach (Attach to a running container) observe (Observe changes to resources and react to them (experimental)) auth (Inspect authorization) options autoscale (Autoscale a deployment config, deployment, replica set, stateful set, or replication controller) patch (Update fields of a resource) cancel-build (Cancel running, pending, or new builds) plugin (Provides utilities for interacting with plugins) cluster-info (Display cluster information) policy (Manage authorization policy) completion (Output shell completion code for the specified shell (bash, zsh, fish, or powershell)) port-forward (Forward one or more local ports to a pod) config (Modify kubeconfig files) process (Process a template into list of resources) --More-- |
Lets deploy mariadb:
|
1 2 3 4 5 6 7 8 9 10 11 12 13 14 15 16 17 18 19 20 21 22 23 24 25 26 27 28 29 30 31 32 33 34 35 36 37 38 39 40 41 42 43 44 45 46 47 48 49 50 51 52 53 54 55 56 57 58 59 60 61 62 63 64 65 66 67 68 69 70 71 72 73 74 75 76 77 78 79 80 81 82 83 84 85 |
$ oc create <tab><tab> build (Create a new build) namespace (Create a namespace with the specified name) clusterresourcequota (Create a cluster resource quota) poddisruptionbudget (Create a pod disruption budget with the specified name) clusterrole (Create a cluster role) priorityclass (Create a priority class with the specified name) clusterrolebinding (Create a cluster role binding for a particular cluster role) quota (Create a quota with the specified name) configmap (Create a config map from a local file, directory or literal value) role (Create a role with single rule) cronjob (Create a cron job with the specified name) rolebinding (Create a role binding for a particular role or cluster role) deployment (Create a deployment with the specified name) route (Expose containers externally via secured routes) deploymentconfig (Create a deployment config with default options that uses a given image) secret (Create a secret using specified subcommand) identity (Manually create an identity (only needed if automatic creation is disabled)) service (Create a service using a specified subcommand) imagestream (Create a new empty image stream) serviceaccount (Create a service account with the specified name) imagestreamtag (Create a new image stream tag) token (Request a service account token) ingress (Create an ingress with the specified name) user (Manually create a user (only needed if automatic creation is disabled)) job (Create a job with the specified name) useridentitymapping (Manually map an identity to a user) $ oc create deployment -h Create a deployment with the specified name. Aliases: deployment, deploy Examples: # Create a deployment named my-dep that runs the busybox image oc create deployment my-dep --image=busybox # Create a deployment with a command oc create deployment my-dep --image=busybox -- date # Create a deployment named my-dep that runs the nginx image with 3 replicas oc create deployment my-dep --image=nginx --replicas=3 # Create a deployment named my-dep that runs the busybox image and expose port 5701 oc create deployment my-dep --image=busybox --port=5701 Options: --allow-missing-template-keys=true: If true, ignore any errors in templates when a field or map key is missing in the template. Only applies to golang and jsonpath output formats. --dry-run='none': Must be "none", "server", or "client". If client strategy, only print the object that would be sent, without sending it. If server strategy, submit server-side request without persisting the resource. --field-manager='kubectl-create': Name of the manager used to track field ownership. --image=[]: Image names to run. -o, --output='': Output format. One of: (json, yaml, name, go-template, go-template-file, template, templatefile, jsonpath, jsonpath-as-json, jsonpath-file). --port=-1: The port that this container exposes. -r, --replicas=1: Number of replicas to create. Default is 1. --save-config=false: If true, the configuration of current object will be saved in its annotation. Otherwise, the annotation will be unchanged. This flag is useful when you want to perform kubectl apply on this object in the future. --show-managed-fields=false: If true, keep the managedFields when printing objects in JSON or YAML format. --template='': Template string or path to template file to use when -o=go-template, -o=go-template-file. The template format is golang templates [http://golang.org/pkg/text/template/#pkg-overview]. --validate='ignore': Must be one of: strict (or true), warn, ignore (or false). "true" or "strict" will use a schema to validate the input and fail the request if invalid. It will perform server side validation if ServerSideFieldValidation is enabled on the api-server, but will fall back to less reliable client-side validation if not. "warn" will warn about unknown or duplicate fields without blocking the request if server-side field validation is enabled on the API server, and behave as "ignore" otherwise. "false" or "ignore" will not perform any schema validation, silently dropping any unknown or duplicate fields. Usage: oc create deployment NAME --image=image -- [COMMAND] [args...] [options] Use "oc options" for a list of global command-line options (applies to all commands). $ oc create deployment mymariadb --image=mariadb deployment.apps/mymariadb created |
Let’s chceck the deployment:
|
1 2 3 4 |
$ oc get pods --show-labels NAME READY STATUS RESTARTS AGE LABELS mymariadb-7b9b9f8bbf-hslm2 0/1 CrashLoopBackOff 8 (44s ago) 16m app=mymariadb,pod-template-hash=7b9b9f8bbf nginx-7548849bf9-95t6v 1/1 Running 0 103m deployment=nginx,pod-template-hash=7548849bf9 |
More information about mymariadb you will have using this command:
|
1 2 3 4 5 6 7 8 9 |
$ oc get all --selector app=mymariadb NAME READY STATUS RESTARTS AGE pod/mymariadb-7b9b9f8bbf-hslm2 0/1 CrashLoopBackOff 8 (2m25s ago) 18m NAME READY UP-TO-DATE AVAILABLE AGE deployment.apps/mymariadb 0/1 1 0 18m NAME DESIRED CURRENT READY AGE replicaset.apps/mymariadb-7b9b9f8bbf 1 1 0 18m |
And::
|
1 2 3 4 5 6 7 8 9 10 11 12 13 14 15 16 17 18 19 20 21 22 23 24 25 26 27 28 29 30 31 32 |
$ oc describe pod mymariadb-7b9b9f8bbf-hslm2 Name: mymariadb-7b9b9f8bbf-hslm2 ... Containers: mariadb: Container ID: cri-o://741766fa717fad0ee4d1597d6763119b2503e823ff9342ea2b940914c20acc92 Image: mariadb Image ID: docker.io/library/mariadb@sha256:c57215c3aabbdb96353ce8b89a7bd6be089f49a4d6bb37f199288a1bf0438a02 Port: <none> Host Port: <none> State: Waiting Reason: CrashLoopBackOff <strong> Last State: Terminated</strong> Reason: Error Exit Code: 1 Started: Sun, 23 Jul 2023 08:50:48 +0000 Finished: Sun, 23 Jul 2023 08:50:48 +0000 ... node.kubernetes.io/unreachable:NoExecute op=Exists for 300s Events: Type Reason Age From Message ---- ------ ---- ---- ------- Normal Scheduled 21m default-scheduler Successfully assigned makarewicz-openshift-dev/mymariadb-7b9b9f8bbf-hslm2 to ip-10-0-196-172.ec2.internal Normal AddedInterface 21m multus Add eth0 [10.128.7.143/23] from ovn-kubernetes Normal Pulled 21m kubelet Successfully pulled image "mariadb" in 228.415356ms (228.424278ms including waiting) Normal Pulled 21m kubelet Successfully pulled image "mariadb" in 231.980697ms (231.988386ms including waiting) Normal Pulled 21m kubelet Successfully pulled image "mariadb" in 1.580646376s (1.580656116s including waiting) Normal Created 20m (x4 over 21m) kubelet Created container mariadb Normal Started 20m (x4 over 21m) kubelet Started container mariadb Normal Pulled 20m kubelet Successfully pulled image "mariadb" in 253.779517ms (253.790607ms including waiting) Normal Pulling 19m (x5 over 21m) kubelet Pulling image "mariadb" Warning BackOff 74s (x95 over 21m) kubelet Back-off restarting failed container mariadb in pod mymariadb-7b9b9f8bbf-hslm2_makarewicz-openshift-dev(8deffe2e-3341-4b11-9258-28b29cd00004) |
As we see the last state of apllication is Terminated.
Let’s check the logs:
|
1 2 3 4 |
$ oc logs mymariadb-7b9b9f8bbf-hslm2 2023-07-23 08:55:59+00:00 [Note] [Entrypoint]: Entrypoint script for MariaDB Server 1:11.0.2+maria~ubu2204 started. 2023-07-23 08:55:59+00:00 [ERROR] [Entrypoint]: Database is uninitialized and password option is not specified You need to specify one of MARIADB_ROOT_PASSWORD, MARIADB_ROOT_PASSWORD_HASH, MARIADB_ALLOW_EMPTY_ROOT_PASSWORD and MARIADB_RANDOM_ROOT_PASSWORD |
The reason why there is an error with mariadb is we didn’t specify password.
We can delete deployment:
|
1 2 3 4 |
$ oc logs mymariadb-7b9b9f8bbf-hslm2 2023-07-23 08:55:59+00:00 [Note] [Entrypoint]: Entrypoint script for MariaDB Server 1:11.0.2+maria~ubu2204 started. 2023-07-23 08:55:59+00:00 [ERROR] [Entrypoint]: Database is uninitialized and password option is not specified You need to specify one of MARIADB_ROOT_PASSWORD, MARIADB_ROOT_PASSWORD_HASH, MARIADB_ALLOW_EMPTY_ROOT_PASSWORD and MARIADB_RANDOM_ROOT_PASSWORD |
Understanding the API
- OpenShift is based on the Kubernetes APIs
- On top of the Kubernetes APIs, OpenShift-specific APIs are added
- OpenShift uses Kubernetes resources, but in many cases offers its own functionality using different APIs
- As a result, OpenShift resources are not always guaranteed to be compatible with Kubernetes resources
Exploring the APIs
oc api-resourcesshows resources as defined in the APIoc api-versionsshows versions of the APIsoc explain [--recursive]can be used to explore what is in the APIs- Based on this information, OpenShift resources can be defined in a declarative way in YAML files
Lab: Managing Resources
- As user developer, create a project with the name
myproject - In this project, create an application using
oc new-app - Use
oc -hto find usage information about this command - Ensure that the application was created successfully
- Write the resources created with the
oc new-appcommand to a YAML file such that the resource can easily be recreated
Solution
|
1 2 3 4 5 6 7 8 9 10 11 12 13 14 15 16 17 18 19 20 21 22 23 24 25 26 27 28 29 30 31 32 33 34 35 36 37 38 39 40 41 42 43 44 45 46 47 48 49 50 51 52 53 54 55 56 57 58 59 60 61 62 63 64 65 66 67 68 69 70 71 72 73 74 75 76 77 78 79 80 81 82 83 84 85 86 87 88 89 90 91 92 93 94 95 96 97 98 99 100 101 102 103 104 105 106 107 108 109 110 111 112 113 114 115 116 117 118 119 120 121 122 123 124 125 126 127 128 129 130 131 132 133 134 135 136 137 138 139 140 141 142 143 144 145 146 147 148 149 150 151 152 153 154 155 156 157 158 159 160 161 162 163 164 165 166 167 168 169 170 171 172 173 174 175 176 177 178 179 180 181 182 183 184 185 186 187 188 189 190 191 192 193 194 195 196 197 198 199 200 201 202 203 204 205 206 207 208 209 210 211 212 213 214 215 216 217 218 219 220 221 222 223 224 225 226 227 228 229 230 231 232 233 234 235 236 237 238 239 240 241 242 243 244 245 246 247 248 249 250 251 252 253 254 255 256 257 258 259 260 261 262 263 264 265 266 267 268 269 270 271 272 273 274 275 276 277 278 279 280 281 282 283 284 285 286 287 288 289 290 291 292 293 294 295 296 297 298 299 300 301 302 303 304 305 306 307 308 309 310 311 312 313 314 315 316 317 318 319 320 321 322 323 324 325 326 327 328 329 330 331 332 333 334 335 336 337 338 339 340 341 342 343 344 345 346 347 348 349 350 351 352 353 354 |
$ oc whoami makarewicz-openshift $ oc login -u developer -p developer Login failed (401 Unauthorized) Verify you have provided the correct credentials. $ oc new-app -h Create a new application by specifying source code, templates, and/or images. This command will try to build up the components of an application using images, templates, or code that has a public repository. It will look up the images on the local container storage (if available), a container image registry, an integrated image stream, or stored templates. If you specify a source code URL, it will set up a build that takes your source code and converts it into an image that can run inside of a pod. Local source must be in a git repository that has a remote repository that the server can see. The images will be deployed via a deployment or deployment configuration, and a service will be connected to the first public port of the app. You may either specify components using the various existing flags or let oc new-app autodetect what kind of components you have provided. If you provide source code, a new build will be automatically triggered. You can use 'oc status' to check the progress. Examples: # List all local templates and image streams that can be used to create an app oc new-app --list # Create an application based on the source code in the current git repository (with a public remote) and a container image oc new-app . --image=registry/repo/langimage # Create an application myapp with Docker based build strategy expecting binary input oc new-app --strategy=docker --binary --name myapp # Create a Ruby application based on the provided [image]~[source code] combination oc new-app centos/ruby-25-centos7~https://github.com/sclorg/ruby-ex.git # Use the public container registry MySQL image to create an app. Generated artifacts will be labeled with db=mysql oc new-app mysql MYSQL_USER=user MYSQL_PASSWORD=pass MYSQL_DATABASE=testdb -l db=mysql # Use a MySQL image in a private registry to create an app and override application artifacts' names oc new-app --image=myregistry.com/mycompany/mysql --name=private # Create an application from a remote repository using its beta4 branch oc new-app https://github.com/openshift/ruby-hello-world#beta4 # Create an application based on a stored template, explicitly setting a parameter value oc new-app --template=ruby-helloworld-sample --param=MYSQL_USER=admin # Create an application from a remote repository and specify a context directory oc new-app https://github.com/youruser/yourgitrepo --context-dir=src/build # Create an application from a remote private repository and specify which existing secret to use oc new-app https://github.com/youruser/yourgitrepo --source-secret=yoursecret # Create an application based on a template file, explicitly setting a parameter value oc new-app --file=./example/myapp/template.json --param=MYSQL_USER=admin # Search all templates, image streams, and container images for the ones that match "ruby" oc new-app --search ruby # Search for "ruby", but only in stored templates (--template, --image-stream and --image # can be used to filter search results) oc new-app --search --template=ruby # Search for "ruby" in stored templates and print the output as YAML oc new-app --search --template=ruby --output=yaml Options: --allow-missing-images=false: If true, indicates that referenced container images that cannot be found locally or in a registry should still be used. --allow-missing-imagestream-tags=false: If true, indicates that image stream tags that don't exist should still be used. --allow-missing-template-keys=false: If true, ignore any errors in templates when a field or map key is missing in the template. Only applies to golang and jsonpath output formats. --as-deployment-config=false: If true create this application as a deployment config, which allows for hooks and custom strategies. --as-test=false: If true create this application as a test deployment, which validates that the deployment succeeds and then scales down. --binary=false: Instead of expecting a source URL, set the build to expect binary contents. Will disable triggers. --build-env=[]: Specify a key-value pair for an environment variable to set into each build image. --build-env-file=[]: File containing key-value pairs of environment variables to set into each build image. --code=[]: Source code to use to build this application. --context-dir='': Context directory to be used for the build. --dry-run=false: If true, show the result of the operation without performing it. -e, --env=[]: Specify a key-value pair for an environment variable to set into each container. --env-file=[]: File containing key-value pairs of environment variables to set into each container. -f, --file=[]: Path to a template file to use for the app. --grant-install-rights=false: If true, a component that requires access to your account may use your token to install software into your project. Only grant images you trust the right to run with your token. --group=[]: Indicate components that should be grouped together as <comp1>+<comp2>. --ignore-unknown-parameters=false: If true, will not stop processing if a provided parameter does not exist in the template. --image=[]: Name of a container image to include in the app. Note: not specifying a registry or repository means defaults in place for client image pulls are employed. -i, --image-stream=[]: Name of an existing image stream to use to deploy an app. --insecure-registry=false: If true, indicates that the referenced container images are on insecure registries and should bypass certificate checking -l, --labels='': Label to set in all resources for this application. -L, --list=false: List all local templates and image streams that can be used to create. --name='': Set name to use for generated application artifacts --no-install=false: Do not attempt to run images that describe themselves as being installable -o, --output='': Output format. One of: (json, yaml, name, go-template, go-template-file, template, templatefile, jsonpath, jsonpath-as-json, jsonpath-file). --output-version='': The preferred API versions of the output objects -p, --param=[]: Specify a key-value pair (e.g., -p FOO=BAR) to set/override a parameter value in the template. --param-file=[]: File containing parameter values to set/override in the template. -S, --search=false: Search all templates, image streams, and container images that match the arguments provided. Note: the container images search is run on the OpenShift cluster via the ImageStreamImport API. -a, --show-all=false: When printing, show all resources (default hide terminated pods.) --show-labels=false: When printing, show all labels as the last column (default hide labels column) --show-managed-fields=false: If true, keep the managedFields when printing objects in JSON or YAML format. --sort-by='': If non-empty, sort list types using this field specification. The field specification is expressed as a JSONPath expression (e.g. '{.metadata.name}'). The field in the API resource specified by this JSONPath expression must be an integer or a string. --source-secret='': The name of an existing secret that should be used for cloning a private git repository. --strategy=: Specify the build strategy to use if you don't want to detect (docker|pipeline|source). NOTICE: the pipeline strategy is deprecated; consider using Jenkinsfiles directly on Jenkins or OpenShift Pipelines. --template=[]: Name of a stored template to use in the app. Usage: oc new-app (IMAGE | IMAGESTREAM | TEMPLATE | PATH | URL ...) [flags] [options] Use "oc options" for a list of global command-line options (applies to all commands). bash-4.4 ~ $ bash-4.4 ~ $ oc new-app nginx bitnami/nginx --> Found image 80e927a (2 days old) in image stream "makarewicz-openshift-dev/nginx" under tag "latest" for "nginx" --> Found container image 80e927a (2 days old) from Docker Hub for "bitnami/nginx" * An image stream tag will be created as "nginx-1:latest" that will track this image --> Creating resources ... error: deployments.apps "nginx" already exists imagestream.image.openshift.io "nginx-1" created deployment.apps "nginx-1" created error: services "nginx" already exists service "nginx-1" created --> Failed bash-4.4 ~ $ oc new-app nginx bitnami/nginx --dry-run=true -o yaml > nynewapp.yaml bash-4.4 ~ $ oc delete Lesson 3 Lab: Managing Resources error: the server doesn't have a resource type "Lesson" bash-4.4 ~ $ oc delete bitnami/nginx error: the server doesn't have a resource type "bitnami" $ oc new-app nginx bitnami/nginx --dry-run=true -o yaml > nynewapp.yaml $ cat nynewapp.yaml apiVersion: v1 items: - apiVersion: apps/v1 kind: Deployment metadata: annotations: image.openshift.io/triggers: '[{"from":{"kind":"ImageStreamTag","name":"nginx:latest","namespace":"makarewicz-openshift-dev"},"fieldPath":"spec.template.spec.containers[?(@.name==\"nginx\")].image"}]' openshift.io/generated-by: OpenShiftNewApp creationTimestamp: null labels: app: nginx app.kubernetes.io/component: nginx app.kubernetes.io/instance: nginx name: nginx spec: replicas: 1 selector: matchLabels: deployment: nginx strategy: {} template: metadata: annotations: openshift.io/generated-by: OpenShiftNewApp creationTimestamp: null labels: deployment: nginx spec: containers: - image: ' ' name: nginx ports: - containerPort: 8080 protocol: TCP - containerPort: 8443 protocol: TCP resources: {} status: {} - apiVersion: apps/v1 kind: Deployment metadata: annotations: image.openshift.io/triggers: '[{"from":{"kind":"ImageStreamTag","name":"nginx-1:latest"},"fieldPath":"spec.template.spec.containers[?(@.name==\"nginx-1\")].image"}]' openshift.io/generated-by: OpenShiftNewApp creationTimestamp: null labels: app: nginx app.kubernetes.io/component: nginx app.kubernetes.io/instance: nginx name: nginx-1 spec: replicas: 1 selector: matchLabels: deployment: nginx-1 strategy: {} template: metadata: annotations: openshift.io/generated-by: OpenShiftNewApp creationTimestamp: null labels: deployment: nginx-1 spec: containers: - image: ' ' name: nginx-1 ports: - containerPort: 8080 protocol: TCP - containerPort: 8443 protocol: TCP resources: {} status: {} - apiVersion: v1 kind: Service metadata: annotations: openshift.io/generated-by: OpenShiftNewApp creationTimestamp: null labels: app: nginx app.kubernetes.io/component: nginx app.kubernetes.io/instance: nginx name: nginx spec: ports: - name: 8080-tcp port: 8080 protocol: TCP targetPort: 8080 - name: 8443-tcp port: 8443 protocol: TCP targetPort: 8443 selector: deployment: nginx status: loadBalancer: {} - apiVersion: v1 kind: Service metadata: annotations: openshift.io/generated-by: OpenShiftNewApp creationTimestamp: null labels: app: nginx app.kubernetes.io/component: nginx app.kubernetes.io/instance: nginx name: nginx-1 spec: ports: - name: 8080-tcp port: 8080 protocol: TCP targetPort: 8080 - name: 8443-tcp port: 8443 protocol: TCP targetPort: 8443 selector: deployment: nginx-1 status: loadBalancer: {} kind: List metadata: {} $ oc create -f nynewapp.yaml deployment.apps/nginx created deployment.apps/nginx-1 created service/nginx created service/nginx-1 created $ oc get all NAME READY STATUS RESTARTS AGE pod/nginx-1-658588fd7-rw6nn 1/1 Running 0 72s pod/nginx-7548849bf9-mddnj 1/1 Running 0 72s |
Deploying a Database Server on OpenShift
Let’s log in to the OpenShift cluster :
|
1 2 3 4 5 6 7 8 9 10 11 12 13 14 15 16 17 18 19 20 21 22 |
# oc login -u system:admin Logged into "https://172.30.9.22:8443" as "system:admin" using existing credentials. You have access to the following projects and can switch between them with 'oc project <projectname>': * chapter1 default kube-dns kube-proxy kube-public kube-system myproject openshift openshift-apiserver openshift-controller-manager openshift-core-operators openshift-infra openshift-node openshift-service-cert-signer openshift-web-console Using project "chapter1". |
Create a new project:
|
1 2 3 4 5 6 7 8 |
# oc new-project mysql-openshift Now using project "mysql-openshift" on server "https://172.30.9.22:8443". You can add applications to this project with the 'new-app' command. For example, try: oc new-app centos/ruby-25-centos7~https://github.com/sclorg/ruby-ex.git to build a new example application in Ruby. |
Create a new application container image using the oc new-app command.
This image requires that you use the -e option to set the MYSQL_USER, MYSQL_PASSWORD, MYSQL_DATABASE, and MYSQL_ROOT_PASSWORD environment variables.
|
1 2 3 4 5 6 7 8 9 10 11 12 13 14 15 16 17 18 19 20 21 22 |
# oc new-app --name=mysql-openshift -p MYSQL_USER=user \ -p MYSQL_PASSWORD=mypass -p MYSQL_DATABASE=testdb \ -p MYSQL_ROOT_PASSWORD=rootpass -p VOLUME_CAPACITY=10Gi mariadb --> Found Docker image 011343c (3 days old) from Docker Hub for "mariadb" * An image stream tag will be created as "mysql-openshift:latest" that will track this image * This image will be deployed in deployment config "mysql-openshift" * Port 3306/tcp will be load balanced by service "mysql-openshift" * Other containers can access this service through the hostname "mysql-openshift" * This image declares volumes and will default to use non-persistent, host-local storage. You can add persistent volumes later by running 'volume dc/mysql-openshift --add ...' * WARNING: Image "mariadb" runs as the 'root' user which may not be permitted by your cluster administrator --> Creating resources ... imagestream.image.openshift.io "mysql-openshift" created deploymentconfig.apps.openshift.io "mysql-openshift" created service "mysql-openshift" created --> Success Application is not exposed. You can expose services to the outside world by executing one or more of the commands below: 'oc expose svc/mysql-openshift' Run 'oc status' to view your app. |
If you want you can use the --template option with the oc new-app command to specify a template with persistent storage so that OpenShift does not try and pull the image from the internet:
|
1 2 3 4 |
# <span class="fontstyle0">oc new-app \ </span><span class="fontstyle2">> </span><span class="fontstyle0">--template=mysql-persistent \ </span><span class="fontstyle2">> </span><span class="fontstyle0">-p MYSQL_USER=user -p MYSQL_PASSWORD=mypass -p MYSQL_DATABASE=testdb \ </span><span class="fontstyle2">> </span><span class="fontstyle0">-p MYSQL_ROOT_PASSWORD=rootpass -p VOLUME_CAPACITY=10Gi</span> |
Verify that the MariaDB pod was created successfully and view the details about the pod and its service. Run the oc status command to view the status of the new application:
|
1 2 3 4 5 6 7 8 |
# oc status In project mysql-openshift on server https://172.30.9.22:8443 svc/mysql-openshift - 172.30.139.165:3306 dc/mysql-openshift deploys istag/mysql-openshift:latest deployment #1 deployed 2 minutes ago - 1 pod 2 infos identified, use 'oc status --suggest' to see details. |
List the pods in this project to verify that the MySQL pod is ready and running:
|
1 2 3 |
# oc get pods -o=wide NAME READY STATUS RESTARTS AGE IP NODE NOMINATED NODE mysql-openshift-1-bbrd5 1/1 Running 0 28m 172.17.0.9 localhost <none> |
Notice the worker on which the pod is running. You need this information to be able to log in to the MySQL database server later.
Use the oc describe command to view more details about the pod:
|
1 2 3 4 5 6 7 8 9 10 11 12 13 14 15 16 17 18 19 20 21 22 23 24 25 26 27 28 29 30 31 32 33 34 35 36 37 38 39 40 41 42 43 44 45 46 47 48 49 50 51 52 53 54 55 56 57 58 59 60 61 62 |
# oc describe pod mysql-openshift-1-bbrd5 Name: mysql-openshift-1-bbrd5 Namespace: mysql-openshift Priority: 0 PriorityClassName: <none> Node: localhost/172.30.9.22 Start Time: Sat, 08 Jul 2023 12:33:52 +0200 Labels: app=mysql-openshift deployment=mysql-openshift-1 deploymentconfig=mysql-openshift Annotations: openshift.io/deployment-config.latest-version=1 openshift.io/deployment-config.name=mysql-openshift openshift.io/deployment.name=mysql-openshift-1 openshift.io/generated-by=OpenShiftNewApp openshift.io/scc=restricted Status: Running IP: 172.17.0.9 Controlled By: ReplicationController/mysql-openshift-1 Containers: mysql-openshift: Container ID: docker://3962296a6904ba1342c09231b09702648cc21c8389e929c982f1d6e01c4a29c4 Image: mariadb@sha256:c57215c3aabbdb96353ce8b89a7bd6be089f49a4d6bb37f199288a1bf0438a02 Image ID: docker-pullable://mariadb@sha256:c57215c3aabbdb96353ce8b89a7bd6be089f49a4d6bb37f199288a1bf0438a02 Port: 3306/TCP Host Port: 0/TCP State: Running Started: Sat, 08 Jul 2023 12:34:08 +0200 Ready: True Restart Count: 0 Environment: MYSQL_DATABASE: testdb MYSQL_PASSWORD: mypass MYSQL_ROOT_PASSWORD: rootpass MYSQL_USER: user Mounts: /var/lib/mysql from mysql-openshift-volume-1 (rw) /var/run/secrets/kubernetes.io/serviceaccount from default-token-cbrkl (ro) Conditions: Type Status Initialized True Ready True ContainersReady True PodScheduled True Volumes: mysql-openshift-volume-1: Type: EmptyDir (a temporary directory that shares a pod's lifetime) Medium: default-token-cbrkl: Type: Secret (a volume populated by a Secret) SecretName: default-token-cbrkl Optional: false QoS Class: BestEffort Node-Selectors: <none> Tolerations: <none> Events: Type Reason Age From Message ---- ------ ---- ---- ------- Normal Scheduled 43m default-scheduler Successfully assigned mysql-openshift/mysql-openshift-1-bbrd5 to localhost Normal Pulling 43m kubelet, localhost pulling image "mariadb@sha256:c57215c3aabbdb96353ce8b89a7bd6be089f49a4d6bb37f199288a1bf0438a02" Normal Pulled 43m kubelet, localhost Successfully pulled image "mariadb@sha256:c57215c3aabbdb96353ce8b89a7bd6be089f49a4d6bb37f199288a1bf0438a02" Normal Created 43m kubelet, localhost Created container Normal Started 43m kubelet, localhost Started container |
List the services in this project and verify that the service to access the MySQL pod was created:
|
1 2 3 |
# oc get svc NAME TYPE CLUSTER-IP EXTERNAL-IP PORT(S) AGE mysql-openshift ClusterIP 172.30.139.165 <none> 3306/TCP 46m |
Retrieve the details of the mysql-openshift service using the oc describe
command and note that the Service type is ClusterIP by default:
|
1 2 3 4 5 6 7 8 9 10 11 12 13 |
# oc describe service mysql-openshift Name: mysql-openshift Namespace: mysql-openshift Labels: app=mysql-openshift Annotations: openshift.io/generated-by=OpenShiftNewApp Selector: app=mysql-openshift,deploymentconfig=mysql-openshift Type: <strong>ClusterIP</strong> IP: 172.30.139.165 Port: 3306-tcp 3306/TCP TargetPort: 3306/TCP Endpoints: 172.17.0.9:3306 Session Affinity: None Events: <none> |
View details about the deployment configuration (dc) for this application:
|
1 2 3 4 5 6 7 8 9 10 11 12 13 14 15 16 17 18 19 20 21 22 23 24 25 26 27 28 29 30 31 32 33 34 35 36 37 38 39 40 41 42 43 44 45 46 |
# oc describe dc mysql-openshift Name: mysql-openshift Namespace: mysql-openshift Created: About an hour ago Labels: app=mysql-openshift Annotations: openshift.io/generated-by=OpenShiftNewApp Latest Version: 1 Selector: app=mysql-openshift,deploymentconfig=mysql-openshift Replicas: 1 Triggers: Config, Image(mysql-openshift@latest, auto=true) Strategy: Rolling Template: Pod Template: Labels: app=mysql-openshift deploymentconfig=mysql-openshift Annotations: openshift.io/generated-by=OpenShiftNewApp Containers: mysql-openshift: Image: mariadb@sha256:c57215c3aabbdb96353ce8b89a7bd6be089f49a4d6bb37f199288a1bf0438a02 Port: 3306/TCP Host Port: 0/TCP Environment: MYSQL_DATABASE: testdb MYSQL_PASSWORD: mypass MYSQL_ROOT_PASSWORD: rootpass MYSQL_USER: user Mounts: /var/lib/mysql from mysql-openshift-volume-1 (rw) Volumes: mysql-openshift-volume-1: Type: EmptyDir (a temporary directory that shares a pod's lifetime) Medium: Deployment #1 (latest): Name: mysql-openshift-1 Created: about an hour ago Status: Complete Replicas: 1 current / 1 desired Selector: app=mysql-openshift,deployment=mysql-openshift-1,deploymentconfig=mysql-openshift Labels: app=mysql-openshift,openshift.io/deployment-config.name=mysql-openshift Pods Status: 1 Running / 0 Waiting / 0 Succeeded / 0 Failed Events: Type Reason Age From Message ---- ------ ---- ---- ------- Normal DeploymentCreated 51m deploymentconfig-controller Created new replication controller "mysql-openshift-1" for version 1 |
Expose the service creating a route with a default name and a fully qualified domain name (FQDN):
|
1 2 3 4 5 6 |
# oc expose service mysql-openshift route.route.openshift.io/mysql-openshift exposed # oc get routes NAME HOST/PORT PATH SERVICES PORT TERMINATION WILDCARD mysql-openshift mysql-openshift-mysql-openshift.172.30.9.22.nip.io mysql-openshift 3306-tcp None |
Connect to the MySQL database server and verify that the database was created successfully. To do that first configure port forwarding between workstation and the database pod running on OpenShift using port 3306. The terminal will hang after executing the command.
|
1 2 3 |
# oc port-forward mysql-openshift-1-bbrd5 3306:3306 Forwarding from 127.0.0.1:3306 -> 3306 Forwarding from [::1]:3306 -> 3306 |
Open another terminal and connect to the MySQL server using the MySQL client.
|
1 2 3 4 5 6 7 8 9 10 |
# mysql -u user -pmypass --protocol tcp -h localhost Welcome to the MariaDB monitor. Commands end with ; or \g. Your MariaDB connection id is 3 Server version: 11.0.2-MariaDB-1:11.0.2+maria~ubu2204 mariadb.org binary distribution Copyright (c) 2000, 2018, Oracle, MariaDB Corporation Ab and others. Type 'help;' or '\h' for help. Type '\c' to clear the current input statement. MariaDB [(none)]> |
Verify the creation of the testdb database.
|
1 2 3 4 5 6 7 8 |
MariaDB [(none)]> show databases; +--------------------+ | Database | +--------------------+ | information_schema | | testdb | +--------------------+ 2 rows in set (0.00 sec) |
Exit from the MySQL prompt:
|
1 2 |
MariaDB [(none)]> exit Bye |
Close the terminal and return to the previous one. Finish the port forwarding process by pressing Ctrl+C
|
1 2 3 4 5 6 7 8 |
# oc get routes NAME HOST/PORT PATH SERVICES PORT TERMINATION WILDCARD mysql-openshift mysql-openshift-mysql-openshift.172.30.9.22.nip.io mysql-openshift 3306-tcp None [root@okd ~]# oc port-forward mysql-openshift-1-bbrd5 3306:3306 Forwarding from 127.0.0.1:3306 -> 3306 Forwarding from [::1]:3306 -> 3306 Handling connection for 3306 ^C[root@okd ~]# |
Delete the project to remove all the resources within the project:
|
1 2 |
# oc delete project mysql-openshift project.project.openshift.io "mysql-openshift" deleted |
Creating Routes
Services allow for network access between pods inside an OpenShift instance, and routes allow for network access to pods from users and applications outside the OpenShift instance.
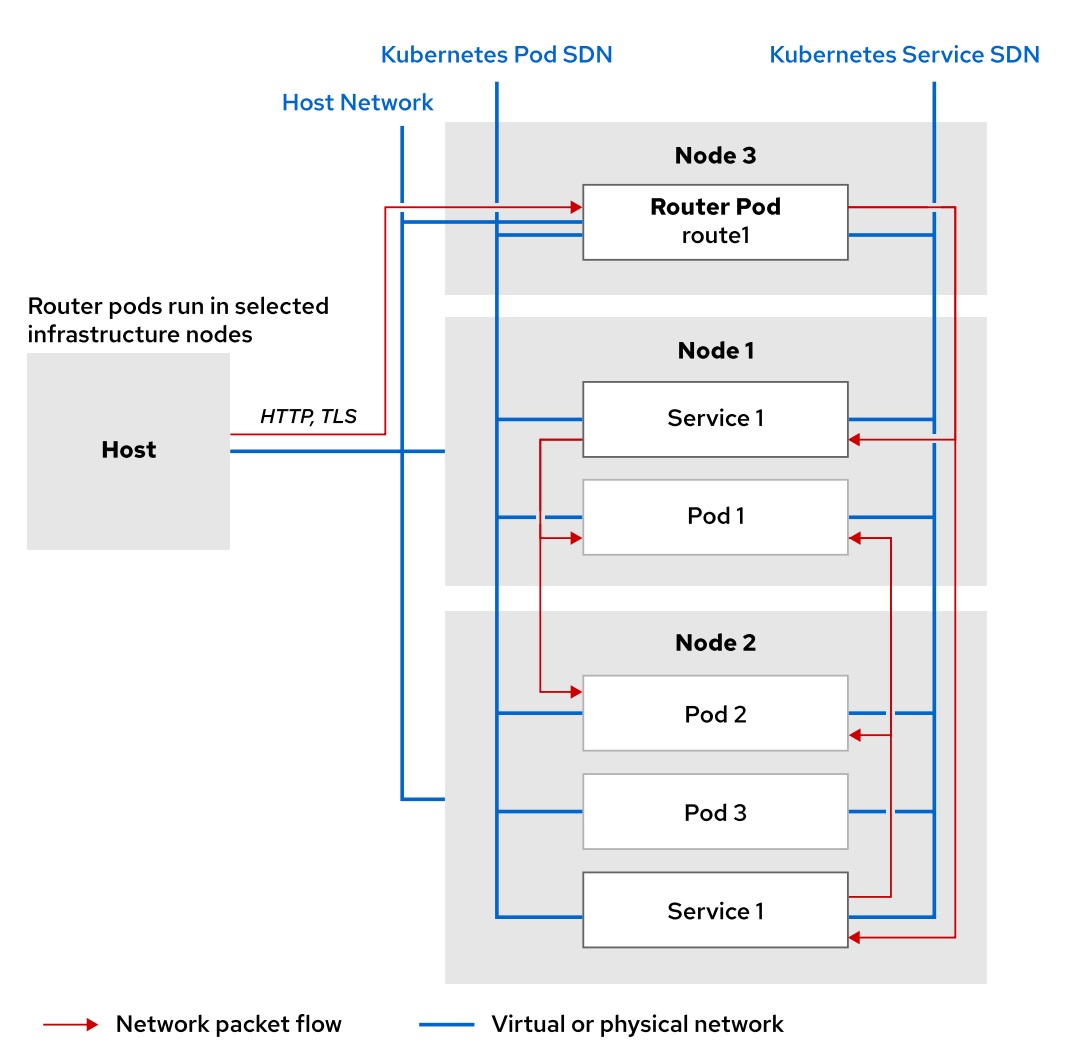
A route connects a public-facing IP address and DNS host name to an internal-facing service IP. It uses the service resource to find the endpoints; that is, the ports exposed by the service. OpenShift routes are implemented by a cluster-wide router service, which runs as a containerized application in the OpenShift cluster. OpenShift scales and replicates router pods like any other
OpenShift application. In practice, to improve performance and reduce latency, the OpenShift router connects directly to the pods using the internal pod software-defined network (SDN).
The router service uses HAProxy as the default implementation. An important consideration for OpenShift administrators is that the public DNS host names
configured for routes need to point to the public-facing IP addresses of the nodes running the router. Router pods, unlike regular application pods, bind to their nodes’ public IP addresses instead of to the internal pod SDN.
The following example shows a minimal route defined using JSON syntax:
|
1 2 3 4 5 6 7 8 9 10 11 12 13 14 |
{ "apiVersion": "v1", "kind": "Route", "metadata": { "name": "quoteapp" }, "spec": { "host": "quoteapp.apps.example.com", "to": { "kind": "Service", "name": "quoteapp" } } } |
The apiVersion, kind, and metadata attributes follow standard Kubernetes resource definition rules. The Route value for kind shows that this is a route resource, and the metadata.name attribute ives this particular route the identifier quoteapp. As with pods and services, the main part is the spec attribute, which is an object containing the following attributes:
hostis a string containing the FQDN associated with the route. DNS must resolve this FQDN to the IP address of the OpenShift router. The details to modify DNS configuration are outside the scope of this course.- to is an object stating the resource this route points to. In this case, the route points to an OpenShift Service with the name set to quoteapp
Use the oc create command to create route resources, just like any other OpenShift resource. You must provide a JSON or YAML resource definition file, which defines the route, to the oc create command.
Another way to create a route is to use the oc expose service command, passing a service resource name as the input. The --name option can be used to control the name of the route resource. For example:
|
1 |
$ oc expose service quotedb --name quote |
By default, routes created by oc expose generate DNS names of the form: route_name-project_name.default-domain
For example, creating a route named quote in project named test from an OpenShift instance where the wildcard domain is cloudapps.example.com results in the FQDN quote-test.cloudapps.example.com.
Leveraging the Default Routing Service
The default routing service is implemented as an HAProxy pod. Router pods, containers, and their configuration can be inspected just like any other resource in an OpenShift cluster:
|
1 2 |
$ oc get pod --all-namespaces | grep router openshift-ingress router-default-746b5cfb65-f6sdm 1/1 Running 1 4d |
Use oc describe pod command to get the routing configuration details:
|
1 2 3 4 5 6 7 8 9 10 11 12 13 14 |
$ oc describe pod router-default-746b5cfb65-f6sdm Name: router-default-746b5cfb65-f6sdm Namespace: openshift-ingress ...output omitted... Containers: router: ...output omitted... Environment: STATS_PORT: 1936 ROUTER_SERVICE_NAMESPACE: openshift-ingress DEFAULT_CERTIFICATE_DIR: /etc/pki/tls/private ROUTER_SERVICE_NAME: default ROUTER_CANONICAL_HOSTNAME: apps.cluster.lab.example.com ...output omitted... |
The subdomain, or default domain to be used in all default routes, takes its value from the ROUTER_CANONICAL_HOSTNAME entry
Exposing a Service as a Route
Log in to the OpenShift cluster
|
1 2 3 4 5 6 7 8 9 10 11 12 13 14 15 16 17 18 19 20 21 22 23 24 25 |
# oc login -u system:admin Logged into "https://172.30.9.22:8443" as "system:admin" using existing credentials. You have access to the following projects and can switch between them with 'oc project <projectname>': chapter1 default kube-dns kube-proxy kube-public kube-system myproject * mysql-openshift openshift openshift-apiserver openshift-controller-manager openshift-core-operators openshift-infra openshift-node openshift-service-cert-signer openshift-web-console Using project "mysql-openshift". # oc whoami system:admin |
Create a new project for the resources you create during this exercise.
|
1 2 3 4 5 6 |
# oc new-project example-route Now using project "example-route" on server "https://172.30.9.22:8443". You can add applications to this project with the 'new-app' command. For example, try: oc new-app centos/ruby-25-centos7~https://github.com/sclorg/ruby-ex.git to build a new example application in Ruby. |
Use the oc new-app command to create the application
|
1 2 3 4 5 6 7 8 9 10 11 12 13 14 15 16 17 18 19 20 21 22 |
# oc new-app quay.io/redhattraining/hello-world-nginx:latest --name helloworld --> Found Docker image 44eaa13 (4 years old) from quay.io for "quay.io/redhattraining/hello-world-nginx:latest" Red Hat Universal Base Image 8 ------------------------------ The Universal Base Image is designed and engineered to be the base layer for all of your containerized applications, middleware and utilities. This base image is freely redistributable, but Red Hat only supports Red Hat technologies through subscriptions for Red Hat products. This image is maintained by Red Hat and updated regularly. Tags: base rhel8 * An image stream tag will be created as "helloworld:latest" that will track this image * This image will be deployed in deployment config "helloworld" * Port 8080/tcp will be load balanced by service "helloworld" * Other containers can access this service through the hostname "helloworld" --> Creating resources ... imagestream.image.openshift.io "helloworld" created deploymentconfig.apps.openshift.io "helloworld" created service "helloworld" created --> Success Application is not exposed. You can expose services to the outside world by executing one or more of the commands below: 'oc expose svc/helloworld' Run 'oc status' to view your app. |
Wait until the application finishes building and deploying by monitoring the progress with the oc get pods -w command:
|
1 2 3 |
# oc get pods -w NAME READY STATUS RESTARTS AGE helloworld-1-478t4 1/1 Running 0 1m |
You can monitor the build and deployment logs with the oc logs -f. Press Ctrl + C to exit the command if necessary.
|
1 |
# oc logs -f helloworld-1-478t4 |
Review the service for this application using the oc describe command:
|
1 2 3 4 5 6 7 8 9 10 11 12 13 |
# oc describe svc/helloworld Name: helloworld Namespace: example-route Labels: app=helloworld Annotations: openshift.io/generated-by=OpenShiftNewApp Selector: app=helloworld,deploymentconfig=helloworld Type: ClusterIP IP: 172.30.137.26 Port: 8080-tcp 8080/TCP TargetPort: 8080/TCP Endpoints: 172.17.0.11:8080 Session Affinity: None Events: <none> |
Expose the service, which creates a route. Use the default name and fully qualified domain name (FQDN) for the route:
|
1 2 3 4 5 6 7 8 9 10 11 12 13 14 15 16 17 18 19 |
# oc expose svc/helloworld route.route.openshift.io/helloworld exposed # oc describe route Name: helloworld Namespace: example-route Created: 40 seconds ago Labels: app=helloworld Annotations: openshift.io/host.generated=true Requested Host: <strong>helloworld-example-route.172.30.9.22.nip.io</strong> exposed on router router 40 seconds ago Path: <none> TLS Termination: <none> Insecure Policy: <none> Endpoint Port: 8080-tcp Service: helloworld Weight: 100 (100%) Endpoints: 172.17.0.11:8080 |
Access the service to verify that the service and route are working.
|
1 2 3 4 5 6 |
# curl helloworld-example-route.172.30.9.22.nip.io <html> <body> <h1>Hello, world from nginx!</h1> </body> </html> |
Replace this route with a route named xyz.
Delete the current route:
|
1 2 |
# oc delete route/helloworld route.route.openshift.io "helloworld" deleted |
Create a route for the service with a name of xyz:
|
1 2 3 4 5 6 7 8 9 10 11 12 13 14 15 16 17 18 19 |
# oc expose svc/helloworld --name=xyz route.route.openshift.io/xyz exposed # oc describe route Name: xyz Namespace: example-route Created: 2 minutes ago Labels: app=helloworld Annotations: openshift.io/host.generated=true Requested Host: <strong>xyz-example-route.172.30.9.22.nip.io</strong> exposed on router router 2 minutes ago Path: <none> TLS Termination: <none> Insecure Policy: <none> Endpoint Port: 8080-tcp Service: helloworld Weight: 100 (100%) Endpoints: 172.17.0.11:8080 |
Note the new FQDN that was generated based on the new route name. Both the route name and the project name contain your user name, hence it appears twice in the route FQDN.
Make an HTTP request using the FQDN on port 80:
|
1 2 3 4 5 6 |
# curl xyz-example-route.172.30.9.22.nip.io <html> <body> <h1>Hello, world from nginx!</h1> </body> </html> |
Delete project:
|
1 |
# oc delete project example-route |