

Understanding Container Storage
- Container Storage by default is ephemeral
- Upon deletion of a container, all files and data inside it are also deleted
- Containers can use volumes or bind mounts to provide persistent storage
- Bind mounts are useful in stand-alone containers; volumes are needed to decouple the storage from the container
- Using volumes guarantees that storage outlives the container lifetime
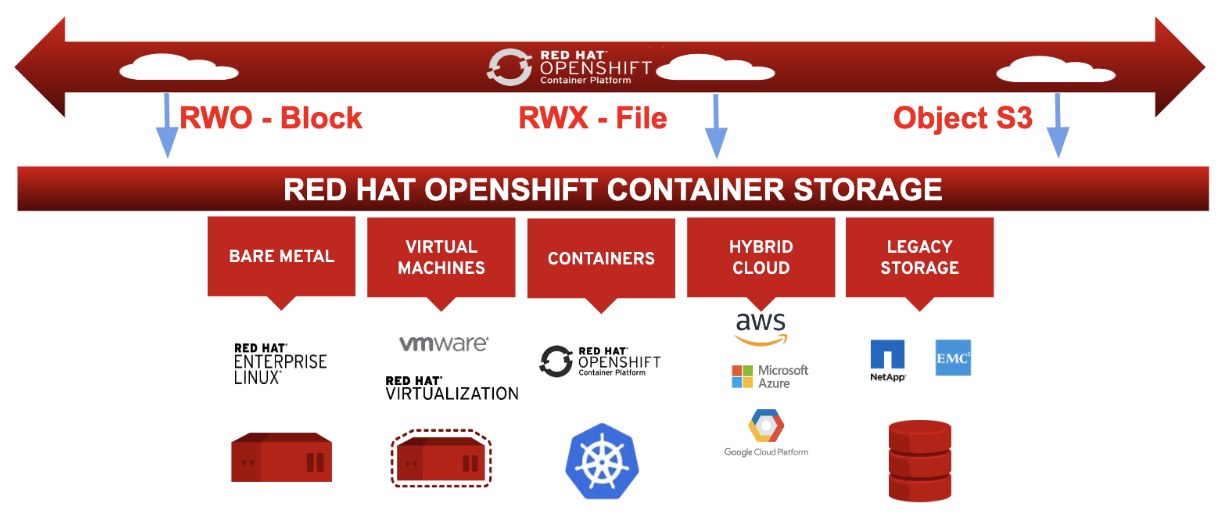
Understanding OpenShift Storage
- OpenShift uses persistent volumes to provision storage
- Storage can be provisioned in a static or dynamic way
- Static provisioning means that the cluster administrator creates the persistent volumes manually
- Dynamic provisioning uses storage classes to create persistent volumes on demand
- OpenShift provides storage classes as the default solution
- Developers are using persistent volume claims to dynamically add storage to the application
Using Pod Volumes
Consider such a simple pod definition (morevolumes.yaml):
|
1 2 3 4 5 6 7 8 9 10 11 12 13 14 15 16 17 18 19 20 21 22 23 24 25 |
apiVersion: v1 kind: Pod metadata: name: morevol2 spec: containers: - name: centos1 image: centos:7 command: - sleep - "3600" volumeMounts: - mountPath: /centos1 name: test - name: centos2 image: centos:7 command: - sleep - "3600" volumeMounts: - mountPath: /centos2 name: test volumes: - name: test emptyDir: {} |
Let’s create this pod:
|
1 2 3 4 5 6 7 8 |
$ oc create -f morevolumes.yaml pod/morevol2 created $ oc get pods NAME READY STATUS RESTARTS AGE morevol2 2/2 Running 0 21s nginx-1-658588fd7-rw6nn 1/1 Running 0 4h51m nginx-7548849bf9-mddnj 1/1 Running 0 4h51m workspacebd3b7f49b120402c-5544445d75-98c2k 2/2 Running 0 27m |
After a while the pod is running:
|
1 2 3 4 5 6 |
$ oc get pods NAME READY STATUS RESTARTS AGE morevol2 2/2 Running 0 62s nginx-1-658588fd7-rw6nn 1/1 Running 0 4h51m nginx-7548849bf9-mddnj 1/1 Running 0 4h51m workspacebd3b7f49b120402c-5544445d75-98c2k 2/2 Running 0 28m |
Let’s see the created pod:
|
1 2 3 4 5 6 7 8 9 10 11 12 13 14 15 16 17 18 19 20 21 22 23 24 25 26 27 28 29 30 31 32 33 34 35 36 37 38 39 40 41 42 43 44 45 46 47 48 49 50 51 52 53 54 55 56 57 58 59 60 61 62 63 64 65 66 67 68 69 70 71 72 73 74 75 76 77 78 79 80 81 82 83 84 85 86 87 88 89 90 91 92 93 94 95 96 97 98 99 100 101 102 103 104 105 106 107 108 109 110 111 112 113 114 115 116 |
$ oc describe pod morevol2 Name: morevol2 Namespace: makarewicz-openshift-dev Priority: -3 Priority Class Name: sandbox-users-pods Service Account: default Node: ip-10-0-196-172.ec2.internal/10.0.196.172 Start Time: Sun, 23 Jul 2023 14:55:03 +0000 Labels: <none> Annotations: k8s.ovn.org/pod-networks: {"default":{"ip_addresses":["10.128.7.223/23"],"mac_address":"0a:58:0a:80:07:df","gateway_ips":["10.128.6.1"],"ip_address":"10.128.7.223/2... k8s.v1.cni.cncf.io/network-status: [{ "name": "ovn-kubernetes", "interface": "eth0", "ips": [ "10.128.7.223" ], "mac": "0a:58:0a:80:07:df", "default": true, "dns": {} }] kubernetes.io/limit-ranger: LimitRanger plugin set: cpu, memory request for container centos1; cpu, memory limit for container centos1; cpu, memory request for contai... openshift.io/scc: restricted-v2 seccomp.security.alpha.kubernetes.io/pod: runtime/default Status: Running IP: 10.128.7.223 IPs: IP: 10.128.7.223 Containers: <strong> centos1:</strong> Container ID: cri-o://a9e548baa7632e6f63898b8cab0e22975e2b83dd2d28933c29f2aaaa973bf14c Image: centos:7 Image ID: quay.io/centos/centos@sha256:e4ca2ed0202e76be184e75fb26d14bf974193579039d5573fb2348664deef76e Port: <none> Host Port: <none> Command: sleep 3600 State: Running Started: Sun, 23 Jul 2023 14:55:08 +0000 Ready: True Restart Count: 0 Limits: cpu: 1 memory: 1000Mi Requests: cpu: 10m memory: 64Mi Environment: <none> Mounts: /centos1 from test (rw) /var/run/secrets/kubernetes.io/serviceaccount from kube-api-access-bk75f (ro) <strong> centos2:</strong> Container ID: cri-o://7f7dcc73df4b6bd60e9e156ab0fd19477a475b70c9404cb03a3b07a3071434d9 Image: centos:7 Image ID: quay.io/centos/centos@sha256:e4ca2ed0202e76be184e75fb26d14bf974193579039d5573fb2348664deef76e Port: <none> Host Port: <none> Command: sleep 3600 State: Running Started: Sun, 23 Jul 2023 14:55:08 +0000 Ready: True Restart Count: 0 Limits: cpu: 1 memory: 1000Mi Requests: cpu: 10m memory: 64Mi Environment: <none> Mounts: /centos2 from test (rw) /var/run/secrets/kubernetes.io/serviceaccount from kube-api-access-bk75f (ro) Conditions: Type Status Initialized True Ready True ContainersReady True PodScheduled True Volumes: test: Type: EmptyDir (a temporary directory that shares a pod's lifetime) Medium: SizeLimit: <unset> kube-api-access-bk75f: Type: Projected (a volume that contains injected data from multiple sources) TokenExpirationSeconds: 3607 ConfigMapName: kube-root-ca.crt ConfigMapOptional: <nil> DownwardAPI: true ConfigMapName: openshift-service-ca.crt ConfigMapOptional: <nil> QoS Class: Burstable Node-Selectors: <none> Tolerations: node.kubernetes.io/memory-pressure:NoSchedule op=Exists node.kubernetes.io/not-ready:NoExecute op=Exists for 300s node.kubernetes.io/unreachable:NoExecute op=Exists for 300s Events: Type Reason Age From Message ---- ------ ---- ---- ------- Normal Scheduled 5m43s default-scheduler Successfully assigned makarewicz-openshift-dev/morevol2 to ip-10-0-196-172.ec2.internal Normal AddedInterface 5m43s multus Add eth0 [10.128.7.223/23] from ovn-kubernetes Normal Pulling 5m43s kubelet Pulling image "centos:7" Normal Pulled 5m38s kubelet Successfully pulled image "centos:7" in 4.431932317s (4.431940349s including waiting) Normal Created 5m38s kubelet Created container centos1 Normal Started 5m38s kubelet Started container centos1 Normal Pulled 5m38s kubelet Container image "centos:7" already present on machine Normal Created 5m38s kubelet Created container centos2 Normal Started 5m38s kubelet Started container centos2 |
As we see in the morevol2 we have two containers: centos1 and centos2. Both containers have mounted volumes.
Let’s check it:
|
1 2 3 4 5 6 7 8 9 10 |
$ oc exec -it morevol2 -c centos1 -- sh sh-4.2$ cd / sh-4.2$ ls anaconda-post.log bin centos1 dev etc home lib lib64 media mnt opt proc root run sbin srv sys tmp usr var sh-4.2$ echo hello-world > /centos1/hello-world.txt sh-4.2$ ls -l /centos1/ total 4 -rw-r--r--. 1 1004130000 1004130000 12 Jul 23 15:10 hello-world.txt sh-4.2$ exit exit |
Exec the container in another way:
|
1 2 3 |
$ oc exec morevol2 -c centos1 -- ls -l /centos1 total 4 -rw-r--r--. 1 1004130000 1004130000 12 Jul 23 15:10 hello-world.txt |
—
Decoupling Storage with Persistent Volumes
Understanding Persistent Volume
- Persistent volumes (Plis) provide storage in a decoupled way
- Administrators create persistent volumes of a type that matches the site-specific storage solution
- Alternatively, StorageClass can be used to automatically provision persistent volumes
- Persistent volumes are available for the entire cluster and not bound to a specific project
- Once a persistent volume is bound to a persistent volume claim (PVC), it cannot service any other claims
Understanding Persistent Volume Claim
- Developers define a persistent volume claim to add access to persistent volumes to their applications
- The Pod volume uses the persistent volume claim to access storage in a decoupled way
- The persistent volume claim does not bind to a specific persistent volume, but uses any persistent volume that matches the claim requirements
- If no matching persistent volume is found, the persistent volume claim will wait until it becomes available
- When a matching persistent volume is found, the persistent volume binds to the persistent volume claim
Let’s explore diffrent options exists for the persisten volumes:
|
1 2 3 4 5 6 7 8 9 10 11 12 13 14 15 16 17 18 19 20 21 22 23 24 25 26 27 28 29 30 31 32 33 34 35 36 37 38 39 40 41 42 43 44 45 46 47 48 49 50 51 52 53 54 55 56 57 58 59 60 61 62 63 64 65 66 67 68 69 70 71 72 73 74 75 76 77 78 79 80 81 82 83 84 85 86 87 88 89 90 91 92 93 94 95 96 97 98 99 100 101 102 103 104 105 106 107 108 109 110 111 112 113 114 115 116 117 118 119 120 121 122 123 124 125 126 127 128 129 130 131 132 133 134 135 136 137 138 139 140 141 142 143 144 145 146 147 148 149 150 151 152 153 154 155 156 |
$ oc explain pv.spec | less KIND: PersistentVolume VERSION: v1 RESOURCE: spec <Object> DESCRIPTION: spec defines a specification of a persistent volume owned by the cluster. Provisioned by an administrator. More info: https://kubernetes.io/docs/concepts/storage/persistent-volumes#persistent-volumes PersistentVolumeSpec is the specification of a persistent volume. FIELDS: accessModes <[]string> accessModes contains all ways the volume can be mounted. More info: https://kubernetes.io/docs/concepts/storage/persistent-volumes#access-modes awsElasticBlockStore <Object> awsElasticBlockStore represents an AWS Disk resource that is attached to a kubelet's host machine and then exposed to the pod. More info: https://kubernetes.io/docs/concepts/storage/volumes#awselasticblockstore azureDisk <Object> azureDisk represents an Azure Data Disk mount on the host and bind mount to the pod. azureFile <Object> azureFile represents an Azure File Service mount on the host and bind mount to the pod. capacity <map[string]string> capacity is the description of the persistent volume's resources and capacity. More info: https://kubernetes.io/docs/concepts/storage/persistent-volumes#capacity cephfs <Object> cephFS represents a Ceph FS mount on the host that shares a pod's lifetime cinder <Object> cinder represents a cinder volume attached and mounted on kubelets host machine. More info: https://examples.k8s.io/mysql-cinder-pd/README.md claimRef <Object> claimRef is part of a bi-directional binding between PersistentVolume and PersistentVolumeClaim. Expected to be non-nil when bound. claim.VolumeName is the authoritative bind between PV and PVC. More info: https://kubernetes.io/docs/concepts/storage/persistent-volumes#binding csi <Object> csi represents storage that is handled by an external CSI driver (Beta feature). fc <Object> fc represents a Fibre Channel resource that is attached to a kubelet's host machine and then exposed to the pod. flexVolume <Object> flexVolume represents a generic volume resource that is provisioned/attached using an exec based plugin. flocker <Object> flocker represents a Flocker volume attached to a kubelet's host machine and exposed to the pod for its usage. This depends on the Flocker control service being running gcePersistentDisk <Object> gcePersistentDisk represents a GCE Disk resource that is attached to a kubelet's host machine and then exposed to the pod. Provisioned by an admin. More info: https://kubernetes.io/docs/concepts/storage/volumes#gcepersistentdisk glusterfs <Object> glusterfs represents a Glusterfs volume that is attached to a host and exposed to the pod. Provisioned by an admin. More info: https://examples.k8s.io/volumes/glusterfs/README.md hostPath <Object> hostPath represents a directory on the host. Provisioned by a developer or tester. This is useful for single-node development and testing only! On-host storage is not supported in any way and WILL NOT WORK in a multi-node cluster. More info: https://kubernetes.io/docs/concepts/storage/volumes#hostpath iscsi <Object> iscsi represents an ISCSI Disk resource that is attached to a kubelet's host machine and then exposed to the pod. Provisioned by an admin. local <Object> local represents directly-attached storage with node affinity mountOptions <[]string> mountOptions is the list of mount options, e.g. ["ro", "soft"]. Not validated - mount will simply fail if one is invalid. More info: https://kubernetes.io/docs/concepts/storage/persistent-volumes/#mount-options nfs <Object> nfs represents an NFS mount on the host. Provisioned by an admin. More info: https://kubernetes.io/docs/concepts/storage/volumes#nfs nodeAffinity <Object> nodeAffinity defines constraints that limit what nodes this volume can be accessed from. This field influences the scheduling of pods that use this volume. persistentVolumeReclaimPolicy <string> persistentVolumeReclaimPolicy defines what happens to a persistent volume when released from its claim. Valid options are Retain (default for manually created PersistentVolumes), Delete (default for dynamically provisioned PersistentVolumes), and Recycle (deprecated). Recycle must be supported by the volume plugin underlying this PersistentVolume. More info: https://kubernetes.io/docs/concepts/storage/persistent-volumes#reclaiming Possible enum values: - `"Delete"` means the volume will be deleted from Kubernetes on release from its claim. The volume plugin must support Deletion. - `"Recycle"` means the volume will be recycled back into the pool of unbound persistent volumes on release from its claim. The volume plugin must support Recycling. - `"Retain"` means the volume will be left in its current phase (Released) for manual reclamation by the administrator. The default policy is Retain. photonPersistentDisk <Object> photonPersistentDisk represents a PhotonController persistent disk attached and mounted on kubelets host machine portworxVolume <Object> portworxVolume represents a portworx volume attached and mounted on kubelets host machine quobyte <Object> quobyte represents a Quobyte mount on the host that shares a pod's lifetime rbd <Object> rbd represents a Rados Block Device mount on the host that shares a pod's lifetime. More info: https://examples.k8s.io/volumes/rbd/README.md scaleIO <Object> scaleIO represents a ScaleIO persistent volume attached and mounted on Kubernetes nodes. storageClassName <string> storageClassName is the name of StorageClass to which this persistent volume belongs. Empty value means that this volume does not belong to any StorageClass. storageos <Object> storageOS represents a StorageOS volume that is attached to the kubelet's host machine and mounted into the pod More info: https://examples.k8s.io/volumes/storageos/README.md volumeMode <string> volumeMode defines if a volume is intended to be used with a formatted filesystem or to remain in raw block state. Value of Filesystem is implied when not included in spec. vsphereVolume <Object> vsphereVolume represents a vSphere volume attached and mounted on kubelets host machine |
Consider such a pv.yaml file:
|
1 2 3 4 5 6 7 8 9 10 11 12 13 |
kind: PersistentVolume apiVersion: v1 metadata: name: pv-volume labels: type: local spec: capacity: storage: 2Gi accessModes: - ReadWriteOnce hostPath: path: "/mnt/mydata" |
We can’t create persitent volumes as developer user and we must switch to kubadmin user:
|
1 2 3 4 5 6 7 8 9 10 11 12 13 14 15 16 17 18 19 20 |
$ oc login -u developer -p developer Login successful. $ oc create -f pv.yaml Error from server (Forbidden): error when creating "pv.yaml": persistentvolumes is forbidden: User "kubeadmin" cannot create persistent volumes at the cluster scope: no RBAC policy matched $ oc login -u kubeadmin -p 6FJQ-4NAO4gaRD5Fk_2r2L-zufcFrIrKzwJ-Tsrxtr0 https://api.sandbox-m3.1530.p1.openshiftapps.com:6443 Using project "default". $ oc create -f pv.yaml persistentvolume/pv-volume created $ oc get pv NAME CAPACITY ACCESS MODES RECLAIM POLICY STATUS CLAIM STORAGECLASS REASON AGE <strong>pv-volume 2Gi RWO Retain Available 1m</strong> pv0001 100Gi RWO,ROX,RWX Recycle Available 21h pv0002 100Gi RWO,ROX,RWX Recycle Available 21h pv0003 100Gi RWO,ROX,RWX Recycle Available 21h pv0004 100Gi RWO,ROX,RWX Recycle Available 21h ... |
Now, consider pvc.yaml:
|
1 2 3 4 5 6 7 8 9 10 |
kind: PersistentVolumeClaim apiVersion: v1 metadata: name: <strong>pv-claim</strong> spec: accessModes: - ReadWriteOnce resources: requests: storage: 1Gi |
Lets create pv-claim:
|
1 2 3 4 5 6 7 8 9 10 11 12 13 14 15 16 17 18 19 20 |
$ oc login -u developer -p developer $ oc create -f pvc.yaml persistentvolumeclaim/pv-claim created $ oc get pvc NAME STATUS VOLUME CAPACITY ACCESS MODES STORAGECLASS AGE pv-claim Pending gp3 58m $ oc get pv No resources found. Error from server (Forbidden): persistentvolumes is forbidden: User "developer" cannot list persistentvolumes at the cluster scope: no RBAC policy matched $ oc login -u kubeadmin -p 6FJQ-4NAO4gaRD5Fk_2r2L-zufcFrIrKzwJ-Tsrxtr0 https://api.sandbox-m3.1530.p1.openshiftapps.com:6443 Using project "default". $ oc get pv NAME CAPACITY ACCESS MODES RECLAIM POLICY STATUS CLAIM STORAGECLASS REASON AGE <strong>pv-volume </strong>2Gi RWO Retain Bound<strong> myproject/pv-claim </strong>1h pv0001 100Gi RWO,ROX,RWX Recycle Available 23h pv0002 100Gi RWO,ROX,RWX Recycle Available 23h pv0003 100Gi RWO,ROX,RWX Recycle Available 23h |
As we see above pv-claim is bound to pv-volume in myproject.
Consider such a pv-pod.yaml file::
|
1 2 3 4 5 6 7 8 9 10 11 12 13 14 15 16 17 18 19 20 |
kind: Pod apiVersion: v1 metadata: name: pv-pod spec: volumes: - name: pv-storage persistentVolumeClaim: claimName: pv-claim containers: - name: pv-container image: bitnami/nginx securityContext: privileged: yes ports: - containerPort: 80 name: "http-server" volumeMounts: - mountPath: "/usr/share/nginx/html" name: pv-storage |
bitnami/nginx is rootless container.
|
1 2 |
$ oc create -f pv-pod.yaml pod/pv-pod created |
Let’s check it out:
|
1 2 3 4 5 6 7 8 9 10 11 12 13 14 15 16 17 18 19 20 21 22 23 24 25 26 27 28 29 30 31 32 33 34 35 36 37 38 39 40 41 42 43 44 45 46 47 48 49 50 51 52 |
$ oc describe pod/pv-pod Name: pv-pod Namespace: default Priority: 0 PriorityClassName: <none> Node: localhost/172.30.9.22 Start Time: Sun, 23 Jul 2023 20:31:25 +0200 Labels: <none> Annotations: openshift.io/scc=privileged Status: <strong>Running</strong> IP: 172.17.0.9 Containers: pv-container: Container ID: docker://0c67067e54302435159b1faacbd126c7359023a145f37a3ff14ae89569de35b1 Image: bitnami/nginx Image ID: docker-pullable://bitnami/nginx@sha256:2d1f6e1612377bbff8f0aa08b1e577da899c16446df5fb47f015a2cc6a54225f Port: 80/TCP Host Port: 0/TCP State: Running Started: Sun, 23 Jul 2023 20:31:28 +0200 Ready: True Restart Count: 0 Environment: <none> Mounts: /usr/share/nginx/html from pv-storage (rw) /var/run/secrets/kubernetes.io/serviceaccount from default-token-r665c (ro) Conditions: Type Status Initialized True Ready True ContainersReady True PodScheduled True Volumes: pv-storage: Type: PersistentVolumeClaim (a reference to a PersistentVolumeClaim in the same namespace) ClaimName: pv-claim ReadOnly: false default-token-r665c: Type: Secret (a volume populated by a Secret) SecretName: default-token-r665c Optional: false QoS Class: BestEffort Node-Selectors: <none> Tolerations: <none> Events: Type Reason Age From Message ---- ------ ---- ---- ------- Normal Scheduled 4s default-scheduler Successfully assigned default/pv-pod to localhost Normal Pulling 3s kubelet, localhost pulling image "bitnami/nginx" Normal Pulled 2s kubelet, localhost Successfully pulled image "bitnami/nginx" Normal Created 2s kubelet, localhost Created container Normal Started 1s kubelet, localhost Started container |
Understanding StorageClass
- Persistent Volumes are used to statically allocate storage
- StorageClass allows containers to use the default storage that is provided in a cluster
- From the developer perspective it doesn’t make a difference, as the developer uses only a PVC to connect to the available storage
- Based on its properties, PVCs can bind to any StorageClass
- Set a default StorageClass to allow developers to bind to the default storage class automatically, without specifying anything specific in the PVC
- If no default StorageClass is set, the PVC needs to specify the name of the StorageClass it wants to bind to
- To set a StorageClass as default, use
oc annotate storageclass standard --overwrite "storageclass.kubernetessio/is-default-class=true"
Understanding StorageClass Provisioners
- In order to create persistent volumes on demand, the storage class needs a provisioner
- The following default provisioners are provided:
- AWS EBC
- Azure File
- Azure Disk
- Cinder
- GCE Persistent Disk
- VMware vSphere
- If you create a storage class for a volume plug-in that does not have a corresponding provisioner, use a storage class provisioner value of
kubernetesio/no-provisioner
Let’s see how we can use strorage class in a manual configuration.
Consider such a pv-pvc-pod.yaml file:
|
1 2 3 4 5 6 7 8 9 10 11 12 13 14 15 16 17 18 19 20 21 22 23 24 25 26 27 28 29 30 31 32 33 34 35 36 37 38 39 40 41 42 43 44 45 |
apiversion: v1 kind: PersistentVolume metadata: name: local-pv-volume spec: storageClassName: manual capacity: storage: 10Gi accessModes: - ReadWriteOnce hostPath: path: "/mnt/data" --- apiVersion: vl kind: PersistentVolumeClaim metadata: name: local-pv-claim namespace: myvol spec: storageClassName: manual accessModes: - ReadWriteOnce resources: requests: storage: 3Gi --- apiVersion: v1 kind: Pod metadata: name: local-pv-pod namespace: myvol spec: volumes: - name: local-pv-storage persistentVolumeClaim: claimName: local-pv-claim containers: - name: local-pv-container image: nginx <a class="ab-item" href="http://miro.borodziuk.eu/wp-admin/profile.php" aria-haspopup="true">Howdy, <span class="display-name">miro</span></a> ports: - containerPort: 80 name: "http-server" volumeMounts: - mountPath: "/usr/share/nginx/html" name: local-pv-storage |
Let’s create it:
|
1 2 3 4 5 6 7 8 9 10 11 |
$ oc create —f pv—pvc—pod.yaml persistentvolume/local—pv—volume created persistentvolumeclaim/local—pv—claim created pod/local—pv—pod created $ oc get pv NAME CAPACITY ACCESS MODES RECLAIM POLICY STATUS CLAIM STORAGECLASS REASON AGE local-pv-volume 10Gi RWO Retain Bound myvol/local—pv—claim manual 3s pv—volume pv0001 ... |
Understanding ConfigMap
- ConfigMaps are used to decouple information
- Different types of information can be stored in ConfigMaps
- Command line parameters
- Variables
- ConfigFiles
Procedure to work wiith ConfigMap
- Start by defining the ConfigMap and create it
- Consider the different sources that can be used for ConfigMaps
kubectl create cm myconf --from-file=my.confkubectl create cm variables --from-env-file=variableskubectl create cm special --from-literal=VAR3=cow --from-literal=VAR4=goat- Verify creation, using
kubectl describe cm <cmname>
- Use
--from-fileto put the contents of a configuration file in the ConfigMap - Use
--from-env-fileto define variables - Use
--from-literalto define variables or command line arguments
Let’s see how to create config maps from variables:
|
1 2 3 4 5 6 7 8 9 10 11 12 13 14 15 16 17 18 19 20 21 22 23 |
$ oc create configmap NAME -h Create a configmap based on a file, directory, or specified literal value. ... Aliases: configmap, cm Usage: oc create configmap NAME [--from-file=[key=]source] [--from-literal=key1=value1] [--dry-run] [flags] Examples: # Create a new configmap named my-config based on folder bar oc create configmap my-config --from-file=path/to/bar # Create a new configmap named my-config with specified keys instead of file basenames on disk oc create configmap my-config --from-file=key1=/path/to/bar/file1.txt --from-file=key2=/path/to/bar/file2.txt # Create a new configmap named my-config with key1=config1 and key2=config2 oc create configmap my-config --from-literal=key1=config1 --from-literal=key2=config2 # Create a new configmap named my-config from the key=value pairs in the file oc create configmap my-config --from-file=path/to/bar # Create a new configmap named my-config from an env file oc create configmap my-config --from-env-file=path/to/bar.env ... |
We have such a file with variables:
|
1 2 3 |
$ cat varfile.txt VAR1=Hello VAR2=World |
We can create config map from this file:
|
1 2 3 4 5 6 7 8 9 10 11 12 13 14 15 16 17 18 19 20 21 22 23 24 25 26 27 28 29 30 31 32 |
$ oc create cm variables --from-env-file=varfile.txt configmap/variables created $ oc get cm variables -o yaml apiVersion: v1 data: VAR1: Hello VAR2: World kind: ConfigMap metadata: creationTimestamp: 2023-07-23T19:41:57Z name: variables namespace: default resourceVersion: "360417" selfLink: /api/v1/namespaces/default/configmaps/variables uid: fbea531c-2990-11ee-8f96-8e5760356a66 $ oc describe cm variables Name: variables Namespace: default Labels: <none> Annotations: <none> Data ==== VAR1: ---- Hello VAR2: ---- World Events: <none> |
If we want to use it:
|
1 2 3 4 5 6 7 8 9 10 11 12 13 14 |
$ cat cm-test-pod.yaml apiVersion: v1 kind: Pod metadata: name: test1 spec: containers: - name: testl image: cirros command: ["/bin/sh", "-c", "env"] envFrom: - configMapRef: name: variables |
Create pod:
|
1 2 |
$ oc create -f cm-test-pod.yaml pod/test1 created |
Let’s check the logs. In the logs we see VAR1 and VAR1.
|
1 2 3 4 5 6 7 8 9 10 11 12 13 14 15 16 17 18 19 20 21 22 23 24 25 26 27 28 29 30 31 32 33 34 35 36 37 38 39 40 41 42 |
$ oc logs test1 ROUTER_PORT_80_TCP_PROTO=tcp KUBERNETES_SERVICE_PORT=443 KUBERNETES_PORT=tcp://172.30.0.1:443 HOSTNAME=test1 SHLVL=1 DOCKER_REGISTRY_PORT_5000_TCP_ADDR=172.30.1.1 HOME=/root ROUTER_SERVICE_PORT_80_TCP=80 ROUTER_PORT_80_TCP=tcp://172.30.110.170:80 ROUTER_PORT_443_TCP_ADDR=172.30.110.170 DOCKER_REGISTRY_PORT_5000_TCP_PORT=5000 DOCKER_REGISTRY_PORT_5000_TCP_PROTO=tcp ROUTER_PORT_443_TCP_PORT=443 ROUTER_PORT_443_TCP_PROTO=tcp DOCKER_REGISTRY_SERVICE_HOST=172.30.1.1 DOCKER_REGISTRY_PORT_5000_TCP=tcp://172.30.1.1:5000 DOCKER_REGISTRY_SERVICE_PORT_5000_TCP=5000 KUBERNETES_PORT_443_TCP_ADDR=172.30.0.1 <strong>VAR1=Hello</strong> ROUTER_SERVICE_PORT_443_TCP=443 ROUTER_PORT_443_TCP=tcp://172.30.110.170:443 PATH=/usr/local/sbin:/usr/local/bin:/usr/sbin:/usr/bin:/sbin:/bin <strong>VAR2=World</strong> KUBERNETES_PORT_443_TCP_PORT=443 ROUTER_SERVICE_HOST=172.30.110.170 KUBERNETES_PORT_443_TCP_PROTO=tcp DOCKER_REGISTRY_SERVICE_PORT=5000 DOCKER_REGISTRY_PORT=tcp://172.30.1.1:5000 ROUTER_PORT_1936_TCP_ADDR=172.30.110.170 ROUTER_PORT_1936_TCP_PORT=1936 ROUTER_SERVICE_PORT=80 ROUTER_PORT=tcp://172.30.110.170:80 ROUTER_PORT_1936_TCP_PROTO=tcp KUBERNETES_PORT_443_TCP=tcp://172.30.0.1:443 KUBERNETES_SERVICE_PORT_HTTPS=443 KUBERNETES_SERVICE_HOST=172.30.0.1 PWD=/ ROUTER_PORT_80_TCP_ADDR=172.30.110.170 ROUTER_SERVICE_PORT_1936_TCP=1936 ROUTER_PORT_1936_TCP=tcp://172.30.110.170:1936 ROUTER_PORT_80_TCP_PORT=80 |
Now, let’s look on tthe second demo which is using config map in diffrent way.
|
1 2 3 4 5 6 7 8 9 10 11 12 13 14 15 16 17 18 19 |
$ oc create cm morevars --from-literal=VAR3=goat --from-literal=VAR4=cow configmap/morevars created $ oc get cm morevars NAME DATA AGE morevars 2 34s [root@okd ~]# oc get cm morevars -o yaml apiVersion: v1 data: VAR3: goat VAR4: cow kind: ConfigMap metadata: creationTimestamp: 2023-07-24T08:35:57Z name: morevars namespace: default resourceVersion: "547714" selfLink: /api/v1/namespaces/default/configmaps/morevars uid: 1c6f04a0-29fd-11ee-8f96-8e5760356a66 |
The third way of using config maps is also very interesting. It has more to do with configuration file.
W have nginx-custom-config.conf file:
|
1 2 3 4 5 6 7 8 |
server { listen 8888; server_name localhost; location / { root /usr/share/nginx/html; index index.html index.htm; } } |
Let’s create config map from this file::
|
1 2 3 4 5 6 7 8 9 10 11 12 13 14 15 16 17 18 19 20 21 22 |
$ oc create cm nginx-cm --from-file=nginx-custom-config.conf configmap/nginx-cm created $ oc describe cm nginx-cm Name: nginx-cm Namespace: default Labels: <none> Annotations: <none> Data ==== nginx-custom-config.conf: ---- server { listen 8888; server_name localhost; location / { root /usr/share/nginx/html; index index.html index.htm; } } Events: <none> |
we can use this cm by creating the pod (nginx-cm.yml):
|
1 2 3 4 5 6 7 8 9 10 11 12 13 14 15 16 17 18 19 20 |
apiVersion: v1 kind: Pod metadata: name: nginx-cm labels: role: web spec: containers: - name: nginx-cm image: nginx volumeMounts: - name: conf mountPath: /etc/nginx/conf.d volumes: - name: conf configMap: name: nginx-cm items: - key: nginx-custom-config.conf path: default.conf |
And create it:
|
1 2 |
$ oc create -f nginx-cm.yml pod/nginx-cm created |
And we can use os exec to execute the shell in the pud just was created:
|
1 |
$ oc exec -it nginx-cm -- /bin/bash |
And we are inside the pod and we can cat the nginx configuration:
|
1 2 3 4 5 6 7 8 9 10 11 12 13 |
root@nginx-cm:/# cat /etc/nginx/conf.d/default.conf server { listen 8888; server_name localhost; location / { root /usr/share/nginx/html; index index.html index.htm; } } root@nginx-cm:/#ctrl+d exit $ |
Local Storage Operator
- Operators can be used to configure additional resources based on custom resource definitions
- Different storage types in OpenShift are provided as operators
- The local storage operator creates a new LocalVolume resource, but also sets up RBAC to allow integration of this resource in the cluster
- The operator itself can be implemented as ready-to-run code, which makes setting it up much easier
Installing the Operator
- Type
crc console; log in askubeadminuser - Select Operators > OperatorHub; check the Storage category
- Select LocalStorage, click Install to install it
- Explore its properties in Operators > Installed Operators
Using the LocalStorage Operator
- Explore operator resources:
oc get all -n openshift-local-storage - Create a block device on the CoreOS CRC machine
ssh -i "/.crc/machines/crc/id_rsa core@$(crc ip)sudo -i • cd Mint; dd if-/devizero of=loopbackfile bs=1M count-1000losetup -fP loopbackfilels -l ideviloop0; exit
oc create -f localstorage.ymloc get all -n openshift-local-storageoc get scwill show the StorageClass in a waiting state
Lab: Managing Storage
Run an nginx Pod that uses persistent storage to store data in /usr/share/nginx/html persistentl.
For the solutiion of this lab let’s create such a pv-pvc-lab.yaml file, because it has already what we need:
|
1 2 3 4 5 6 7 8 9 10 11 12 13 14 15 16 17 18 19 20 21 22 23 24 25 26 27 28 29 30 31 32 33 34 35 36 37 38 39 40 41 42 43 44 45 |
apiVersion: v1 kind: PersistentVolume metadata: name: lab4pv spec: storageClassName: lab4 capacity: storage: 1Gi accessModes: - ReadWriteOnce hostPath: path: "/mnt/lab4" --- apiVersion: v1 kind: PersistentVolumeClaim metadata: name: lab4-pvc namespace: default spec: storageClassName: lab4 accessModes: - ReadWriteOnce resources: requests: storage: 1Gi --- apiVersion: v1 kind: Pod metadata: name: lab4pod namespace: default spec: volumes: - name: local-pv-storage persistentVolumeClaim: claimName: lab4-pvc containers: - name: lab4-container image: bitnami/nginx ports: - containerPort: 8888 name: "http-server" volumeMounts: - mountPath: "/usr/share/nginx/html" name: local-pv-storage |
Let’s create the pod from this file::
|
1 2 3 4 5 6 7 8 9 10 11 12 13 14 15 16 17 18 19 20 21 22 23 24 25 26 27 28 29 30 31 32 33 34 35 36 37 38 39 40 41 42 43 44 45 46 47 48 49 50 51 52 53 54 55 56 57 58 59 60 61 62 63 64 65 66 67 68 69 70 71 72 73 74 |
$ oc create -f pv-pvc-lab.yaml persistentvolume/lab4pv created persistentvolumeclaim/lab4-pvc created pod/lab4pod created $ oc get pv NAME CAPACITY ACCESS MODES RECLAIM POLICY STATUS CLAIM STORAGECLASS REASON AGE lab4pv 1Gi RWO Retain Bound default/lab4-pvc lab4 9s pv-volume 2Gi RWO Retain Bound myproject/pv-claim 17h pv0001 100Gi RWO,ROX,RWX Recycle Available 1d ... $ oc describe pod lab4pod Name: lab4pod Namespace: default Priority: 0 PriorityClassName: <none> Node: localhost/172.30.9.22 Start Time: Mon, 24 Jul 2023 12:29:08 +0200 Labels: <none> Annotations: openshift.io/scc=anyuid Status: Running IP: 172.17.0.12 Containers: lab4-container: Container ID: docker://589d0c99e2f7f06f7b1ddfcc4b1ef225b02b395a3e9de1517ca712bce9e3b9c9 Image: bitnami/nginx Image ID: docker-pullable://bitnami/nginx@sha256:e91f0a4171ea26b0612398a4becb5503d35de67dcbbc7bde9f50374572dea6ac Port: 8888/TCP Host Port: 0/TCP State: Running Started: Mon, 24 Jul 2023 12:29:17 +0200 Ready: True Restart Count: 0 Environment: <none> Mounts: /usr/share/nginx/html from local-pv-storage (rw) /var/run/secrets/kubernetes.io/serviceaccount from default-token-r665c (ro) Conditions: Type Status Initialized True Ready True ContainersReady True PodScheduled True Volumes: local-pv-storage: Type: PersistentVolumeClaim (a reference to a PersistentVolumeClaim in the same namespace) ClaimName: lab4-pvc ReadOnly: false default-token-r665c: Type: Secret (a volume populated by a Secret) SecretName: default-token-r665c Optional: false QoS Class: BestEffort Node-Selectors: <none> Tolerations: <none> Events: Type Reason Age From Message ---- ------ ---- ---- ------- Normal Scheduled 38s default-scheduler Successfully assigned default/lab4pod to localhost Normal Pulling 37s kubelet, localhost pulling image "bitnami/nginx" Normal Pulled 29s kubelet, localhost Successfully pulled image "bitnami/nginx" Normal Created 29s kubelet, localhost Created container Normal Started 29s kubelet, localhost Started container $ oc get pods NAME READY STATUS RESTARTS AGE docker-registry-1-ctgff 1/1 Running 0 1d <strong>lab4pod </strong> 1/1 Running 0 1m nginx-cm 1/1 Running 0 1h persistent-volume-setup-8f6lt 0/1 Completed 0 1d pv-pod 1/1 Running 0 15h router-1-k8zgt 1/1 Running 0 1d test1 0/1 CrashLoopBackOff 29 2h |
Everything went ok.