

Containers, images, and image registries need to be able to interact with each other. For example, you need to be able to build images and put them into image registries. You also need to be able to retrieve an image from the image registry and build a container from that image. Podman is an open source tool for managing containers and container images and interacting with
image registries.
It offers the following key features:
- It uses image format specified by the Open Container Initiative [https://
www.opencontainers.org] (OCI). Those specifications define an standard, community-driven, non-proprietary image format. - Podman stores local images in local file-system. Doing so avoids unnecessary client/server architecture or having daemons running on local machine.
- Podman follows the same command patterns as the Docker CLI, so there is no need to learn a new toolset.
- Podman is compatible with Kubernetes. Kubernetes can use Podman to manage its containers.
Currently, Podman is only available on Linux systems. To install Podman in Red Hat Enterprise Linux, CentOS, Fedora or similar RPM-based systems:
|
1 |
# dnf install podman |
or
|
1 |
# yum install podman |
To get some help and find out how Podman is working, you can use the help:
|
1 2 |
$ sudo podman --help $ sudo podman <subcommand> --help |
For more details, you can review the manpages:
|
1 2 |
$ man podman $ man podman-<subcommand> |
If you have prior experience with docker you won’t have any problem to work with podman. Podman use the same commands as docker so you can define an alias in your bash shell if you wan’t:
|
1 |
$ alias docker=podman |
Fetching Container Images with Podman
Applications can run inside containers as a way to provide them with an isolated and controlled execution environment. Running a containerized application, that is, running an application inside a container, requires a container image, a file system bundle providing all application files, libraries, and dependencies the application needs to run. Container images can be found in image registries: services that allow users to search and retrieve container images. Podman users can use the search subcommand to find available images from remote or local registries:
|
1 2 3 4 5 6 7 8 9 10 11 12 13 14 15 16 17 18 19 20 21 22 23 24 25 26 27 |
$ sudo podman search centos INDEX NAME DESCRIPTION STARS OFFICIAL AUTOMATED docker.io docker.io/library/centos DEPRECATED; The official build of CentOS. 7538 [OK] docker.io docker.io/kasmweb/centos-7-desktop CentOS 7 desktop for Kasm Workspaces 34 docker.io docker.io/bitnami/centos-base-buildpack Centos base compilation image 0 [OK] docker.io docker.io/bitnami/centos-extras-base 0 docker.io docker.io/couchbase/centos7-systemd centos7-systemd images with additional debug... 7 [OK] docker.io docker.io/continuumio/centos5_gcc5_base 3 docker.io docker.io/datadog/centos-i386 0 docker.io docker.io/dokken/centos-7 CentOS 7 image for kitchen-dokken 6 docker.io docker.io/dokken/centos-8 CentOS 8 image for kitchen-dokken 3 docker.io docker.io/dokken/centos-6 CentOS 6 image for kitchen-dokken 0 docker.io docker.io/spack/centos7 CentOS 7 with Spack preinstalled 1 docker.io docker.io/spack/centos6 CentOS 6 with Spack preinstalled 1 docker.io docker.io/ustclug/centos Official CentOS Image with USTC Mirror 0 docker.io docker.io/couchbase/centos-72-java-sdk 0 docker.io docker.io/couchbase/centos-72-jenkins-core 0 docker.io docker.io/dokken/centos-stream-8 4 docker.io docker.io/eclipse/centos_jdk8 CentOS, JDK8, Maven 3, git, curl, nmap, mc, ... 3 [OK] docker.io docker.io/couchbase/centos-70-sdk-build 0 docker.io docker.io/couchbase/centos-69-sdk-build 0 docker.io docker.io/couchbase/centos-69-sdk-nodevtoolset-build 0 docker.io docker.io/corpusops/centos-bare https://github.com/corpusops/docker-images/ 0 docker.io docker.io/dokken/centos-stream-9 4 docker.io docker.io/corpusops/centos centos corpusops baseimage 0 docker.io docker.io/srcml/centos_x86_64_base srcML build environment on CentOS 0 [OK] docker.io docker.io/eclipse/centos_go Centos + Go 0 [OK] |
After you have found an image, you can use Podman to download it. When using the pull subcommand, Podman fetches the image and saves it locally for future use:
|
1 2 3 4 5 6 7 8 9 10 11 |
$ sudo podman pull centos Trying to pull registry.access.redhat.com/centos... name unknown: Repo not found Trying to pull registry.redhat.io/centos... unable to retrieve auth token: invalid username/password: unauthorized: Please login to the Red Hat Registry using your Customer Portal credentials. Further instructions can be found here: https://access.redhat.com/RegistryAuthentication Trying to pull docker.io/library/centos... Getting image source signatures Copying blob a1d0c7532777 done Copying config 5d0da3dc97 done Writing manifest to image destination Storing signatures |
Container images are named based on the following syntax:
registry_name/user_name/image_name:tag
registry_name, the name of the registry storing the image. It is usually the FQDN of the registry.user_namestands for the user or organization the image belongs to.- The
image_nameshould be unique in user namespace. - The
tagidentifies the image version. If the image name includes no image tag, latest is assumed.
After retrieval, Podman stores images locally and you can list them with the images subcommand:
|
1 2 3 |
$ sudo podman images REPOSITORY TAG IMAGE ID CREATED SIZE docker.io/library/centos latest 5d0da3dc9764 18 months ago 239 MB |
Let’s pull the hello-world app:
|
1 2 3 4 5 6 7 8 9 10 11 12 13 14 15 16 17 |
$ sudo podman pull hello-world Trying to pull registry.access.redhat.com/hello-world... name unknown: Repo not found Trying to pull registry.redhat.io/hello-world... unable to retrieve auth token: invalid username/password: unauthorized: Please login to the Red Hat Registry using your Customer Portal credentials. Further instructions can be found here: https://access.redhat.com/RegistryAuthentication Trying to pull docker.io/library/hello-world... Getting image source signatures Copying blob 2db29710123e done Copying config feb5d9fea6 done Writing manifest to image destination Storing signatures feb5d9fea6a5e9606aa995e879d862b825965ba48de054caab5ef356dc6b3412 $ sudo podman images REPOSITORY TAG IMAGE ID CREATED SIZE docker.io/library/hello-world latest feb5d9fea6a5 18 months ago 19.9 kB docker.io/library/centos latest 5d0da3dc9764 18 months ago 239 MB |
Now we can run our test app:
|
1 2 3 4 5 6 7 8 9 10 11 12 13 14 15 16 17 18 19 20 21 22 |
$ sudo podman run hello-world:latest Hello from Docker! This message shows that your installation appears to be working correctly. To generate this message, Docker took the following steps: 1. The Docker client contacted the Docker daemon. 2. The Docker daemon pulled the "hello-world" image from the Docker Hub. (amd64) 3. The Docker daemon created a new container from that image which runs the executable that produces the output you are currently reading. 4. The Docker daemon streamed that output to the Docker client, which sent it to your terminal. To try something more ambitious, you can run an Ubuntu container with: $ docker run -it ubuntu bash Share images, automate workflows, and more with a free Docker ID: https://hub.docker.com/ For more examples and ideas, visit: https://docs.docker.com/get-started/ |
If the images require interacting with the user with console input, Podman can redirect container input and output streams to the console. The run subcommand requires the -t and -i flags (or, in short, -it flag) to enable interactivity.
|
1 2 3 4 5 |
$ sudo podman run -it centos:latest /bin/bash [root@ff0aa3703f2a /]# whoami root # cat /etc/system-release CentOS Linux release 8.4.2105 |
To start a container image as a background process, pass the -d option to the podman run command:
|
1 2 3 4 5 6 7 8 9 10 11 12 13 14 15 16 17 18 19 20 21 22 23 24 25 |
$ sudo podman pull httpd Trying to pull registry.access.redhat.com/httpd... name unknown: Repo not found Trying to pull registry.redhat.io/httpd... unable to retrieve auth token: invalid username/password: unauthorized: Please login to the Red Hat Registry using your Customer Portal credentials. Further instructions can be found here: https://access.redhat.com/RegistryAuthentication Trying to pull docker.io/library/httpd... Getting image source signatures Copying blob ace056404ed3 done Copying blob 6b400bbb27df done Copying blob f1f26f570256 done Copying blob a6b093ae1967 done Copying blob d9833ead928a done Copying config 192d415834 done Writing manifest to image destination Storing signatures 192d41583429c96af40eb3af02d4baaf6398c178e832c114abe030ff986ee826 $ sudo podman images REPOSITORY TAG IMAGE ID CREATED SIZE docker.io/library/httpd latest 192d41583429 3 days ago 150 MB docker.io/library/hello-world latest feb5d9fea6a5 18 months ago 19.9 kB docker.io/library/centos latest 5d0da3dc9764 18 months ago 239 MB $ sudo podman run -d httpd 0d267a14f68d0359e3f75d3d0c7eeff486e758dcf4625dcdfbb16c017a6ea771 |
Many Podman flags also have an alternative long form; some of these are explained below.
• -t is equivalent to --tty, meaning a pseudo-tty (pseudo-terminal) is to be
allocated for the container.
• -i is the same as --interactive. When used, standard input is kept open into the container.
• -d, or its long form --detach, means the container runs in the background
(detached). Podman then prints the container id.
Now let’s map containers port (option -p):
|
1 2 3 4 5 6 7 8 9 10 11 12 13 14 |
$ sudo podman stop httpd $ $ sudo podman ps CONTAINER ID IMAGE COMMAND CREATED STATUS PORTS NAMES $ sudo podman run -d -p 8080:80 --name http-basic docker.io/library/httpd a39fe8bb12cc266b2c5cde246747557e8a13a49dc8a9d19ed0f737f4a4c3f7bc $ sudo podman ps CONTAINER ID IMAGE COMMAND CREATED STATUS PORTS NAMES a39fe8bb12cc docker.io/library/httpd:latest httpd-foreground 4 seconds ago Up 4 seconds ago 0.0.0.0:8080->80/tcp http-basic $ curl http://localhost:8080 <html><body><h1>It works!</h1></body></html> |
podman inspect: This command lists metadata about a running or stopped container. The command produces JSON output:
|
1 2 3 4 5 6 7 8 9 10 11 12 13 14 15 16 17 18 19 20 21 22 23 24 25 26 27 28 29 30 |
$ sudo podman inspect http_basic [ { "Id": "a4cfeff041f879b510107beac1403e3c2e7a7610fa31f735763418ecffd48384", "Created": "2023-05-23T13:31:27.000990922+02:00", "Path": "httpd-foreground", "Args": [ "httpd-foreground" ], "State": { "OciVersion": "1.0.1-dev", "Status": "running", "Running": true, "Paused": false, "Restarting": false, "OOMKilled": false, "Dead": false, "Pid": 30954, "ConmonPid": 30942, "ExitCode": 0, "Error": "", "StartedAt": "2023-05-23T13:31:27.377970946+02:00", "FinishedAt": "0001-01-01T00:00:00Z", "Healthcheck": { "Status": "", "FailingStreak": 0, "Log": null } }, "Image": "192d41583429c96af40eb3a<br> |
This command allows formatting of the output string using the given Go template with the -f option. For example, to retrieve only the IP address, use the following command:
|
1 2 3 4 5 |
$ sudo podman inspect -l -f "{{.NetworkSettings.IPAddress}}" 10.88.0.17 $ curl http://10.88.0.17:80 <html><body><h1>It works!</h1></body></html> |
The previous example ran a containerized Apache HTTP server in the background. Then, the example uses the podman inspect command to retrieve the container’s internal IP address from container metadata. Finally, it uses the IP address to fetch the root page from Apache HTTP server. This response proves the container is still up and running after the podman run command.
If the image to be executed is not available locally when using the podman run
command, Podman automatically uses pull to download the image.
When referencing the container, Podman recognizes a container either with the container name or the generated container id. Use the --name option to set the container name when running the container with Podman. Container names must be unique. If the podman run command includes no container name, Podman generates a unique random name. If the images require interacting with the user with console input, Podman can redirect container input and output streams to the console. The run subcommand requires the -t and -i flags (or, in short, -it flag) to enable interactivity.
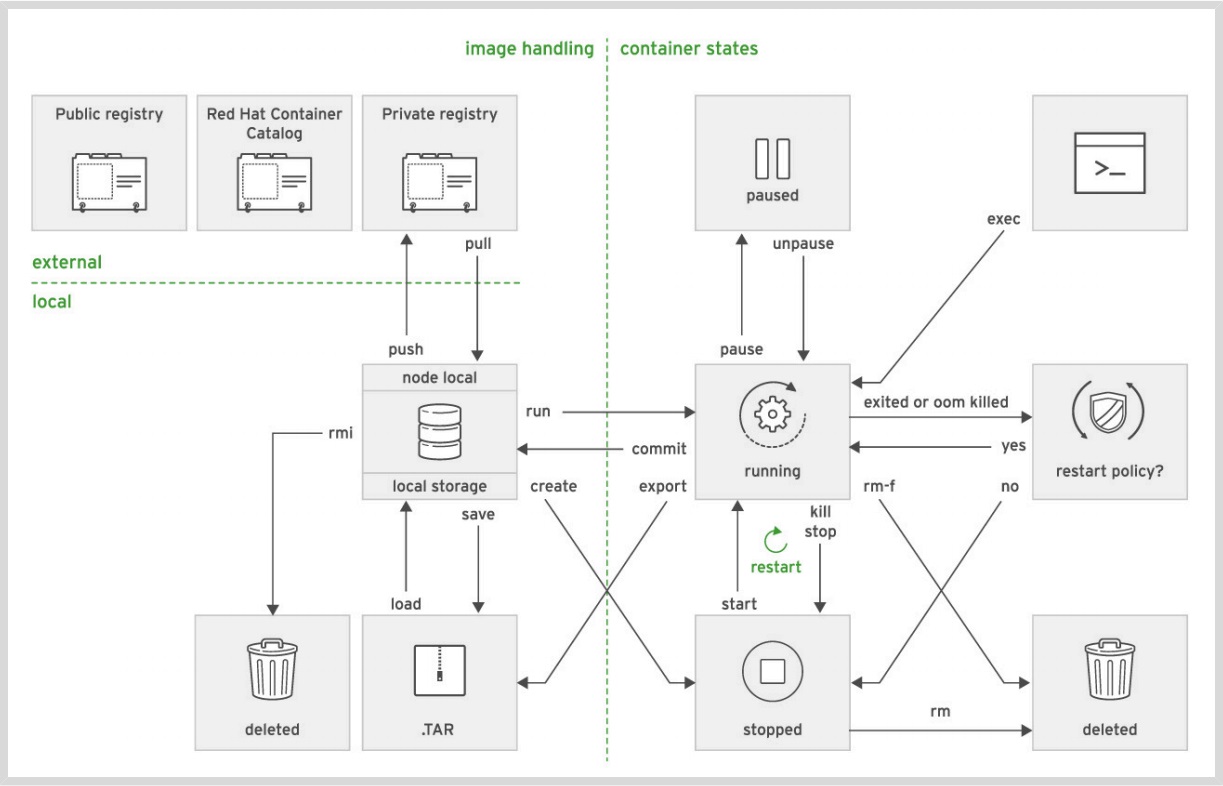
The following figure shows a summary of the most commonly used
subcommands that change container and image state.
Podman also provides a set of useful subcommands to obtain information about running and stopped containers.
The podman run command creates a new container from an image and starts a process inside the new container. If the container image is not available locally, this command attempts to download the image using the configured image repository:
-
podman execcommand starts an additional process inside an already running container:
|
1 2 3 4 5 6 7 8 9 10 11 |
$ sudo podman exec http-basic ls bin build cgi-bin conf error htdocs icons include logs modules |
Podman remembers the last container used in any command. Developers can skip writing this container’s ID or name in later Podman commands by replacing the container id by the -l option:
|
1 2 3 4 5 6 7 8 9 10 11 |
$ sudo podman exec -l ls bin build cgi-bin conf error htdocs icons include logs modules |
Let’s start a Bash session inside the container.
|
1 2 3 4 5 6 7 8 9 |
$ sudo podman exec -it http_basic /bin/bash root@a4cfeff041f8:/usr/local/apache2# ls bin build cgi-bin conf error htdocs icons include logs modules root@a4cfeff041f8:/usr/local/apache2# cd htdocs root@a4cfeff041f8:/usr/local/apache2/htdocs# ls index.html root@a4cfeff041f8:/usr/local/apache2/htdocs# cat in* <html><body><h1>It works!</h1></body></html> |
Change the index.html file to contain the text Hello World, replacing all of the
existing content.
|
1 2 3 4 5 6 |
root@a4cfeff041f8:/usr/local/apache2/htdocs# echo "Hello World" > index.html root@a4cfeff041f8:/usr/local/apache2/htdocs# exit exit $ curl http://localhost:8080 Hello World |
Podman identifies containers by a unique container ID or container name. The podman ps command displays the container ID and names for all actively running containers:
|
1 2 3 |
$ sudo podman ps CONTAINER ID IMAGE COMMAND CREATED STATUS PORTS NAMES a4cfeff041f8 docker.io/library/httpd:latest httpd-foreground 4 hours ago Up 4 hours ago 0.0.0.0:8080->80/tcp http_basic |
The container ID is unique and generated automatically. The container name can be manually specified, otherwise it is generated automatically. This name must be unique or the run command fails.
Podman does not discard stopped containers immediately. Podman preserves their local file systems and other states for facilitating postmortem analysis. Option -a lists all containers, including stopped ones:
|
1 2 3 4 5 6 7 |
$ sudo podman ps -a CONTAINER ID IMAGE COMMAND CREATED STATUS PORTS NAMES eeece99335c8 docker.io/library/httpd:latest httpd-foreground 3 hours ago Exited (0) 40 minutes ago peaceful_thompson 245e1124ec8f docker.io/library/mysql:latest mysqld 7 hours ago Exited (2) 7 hours ago mysql-basic a227d24d0e95 docker.io/library/mariadb:latest mariadbd 21 hours ago Exited (1) 21 hours ago relaxed_perlman 0dc0804c2fc2 docker.io/library/centos:latest printenv GREET NA... 25 hours ago Exited (0) 25 hours ago funny_gould 99456cc51b79 docker.io/library/hello-world:latest /hello 27 hours ago Exited (0) 27 hours ago zealous_roentgen |
-
podman stop: This command stops a running container gracefully:
|
1 2 |
$ sudo podman stop http_basic a4cfeff041f879b510107beac1403e3c2e7a7610fa31f735763418ecffd48384 |
-
podman kill: This command sends Unix signals to the main process in the container. If no signal is specified, it sends the SIGKILL signal, terminating the main process and the container.
|
1 2 |
$ sudo podman kill my-example-container 77d4b7b8ed1fd57449163bcb0b78d205e70d2314273263ab941c0c371ad5 412 |
You can specify the signal with the -s option:
|
1 2 |
$ sudo podman kill -s SIGKILL my-example-container 77d4b7b8ed1fd57449163bcb0b78d205e70d2314273263ab941c0c371ad56412 |
Any Unix signal can be sent to the main process. Podman accepts either the signal name and number. The following table shows several useful signals:
Signal Value Default Action Comment
SIGHUP 1 Term Hangup detected on controlling terminal or death of controlling process
SIGINT 2 Term Interrupt from keyboard
SIGQUIT 3 Core Quit from keyboard
SIGILL 4 Core Illegal Instruction
SIGABRT 6 Core Abort signal from abort(3)
SIGFPE 8 Core Floating point exception
SIGKILL 9 Term Kill signal
SIGSEGV 11 Core Invalid memory reference
SIGPIPE 13 Term Broken pipe: write to pipe with no readers
SIGALRM 14 Term Timer signal from alarm(2)
SIGTERM 15 Term Termination signal
SIGUSR1 30,10,16 Term User-defined signal 1
SIGUSR2 31,12,17 Term User-defined signal 2
SIGCHLD 20,17,18 Ign Child stopped or terminated
SIGCONT 19,18,25 Cont Continue if stopped
SIGSTOP 17,19,23 Stop Stop process
SIGTSTP 18,20,24 Stop Stop typed at tty
SIGTTIN 21,21,26 Stop tty input for background process
SIGTTOU 22,22,27 Stop tty output for background process
podman restart: This command restarts a stopped container:
|
1 2 |
$ sudo podman restart my-httpd-container 77d4b7b8ed1fd57449163bcb0b78d205e70d2314273263ab941c0c371ad56412 |
The podman restart command creates a new container with the same container ID, reusing the stopped container state and file system.
podman rm: This command deletes a container and discards its state and file system:
|
1 2 |
$ sudo podman rm my-httpd-container 77d4b7b8ed1fd57449163bcb0b78d205e70d2314273263ab941c0c371ad56412 |
The -f option of the rm subcommand instructs Podman to remove the container even if not stopped. This option terminates the container forcefully and then removes it. Using -f option is equivalent to podman kill and podman rm commands together. You can delete all containers at the same time. Many podman subcommands accept the -a option. This option indicates using the subcommand on all available containers or images. The following example removes all containers:
|
1 2 3 4 |
$ sudo podman rm -a 5fd8e98ec7eab567eabe84943fe82e99fdfc91d12c65d99ec760d5a55b8470d6 716fd687f65b0957edac73b84b3253760e915166d3bc620c4aec8e5f4eadfe8e 86162c906b44f4cb63ba2e3386554030dcb6abedbcee9e9fcad60aa9f8b2d5d4 |
Before deleting all containers, all running containers must be in a “stopped” status. You can use the following command to stop all containers:
|
1 2 3 4 |
$ sudo podman stop -a 5fd8e98ec7eab567eabe84943fe82e99fdfc91d12c65d99ec760d5a55b8470d6 716fd687f65b0957edac73b84b3253760e915166d3bc620c4aec8e5f4eadfe8e 86162c906b44f4cb63ba2e3386554030dcb6abedbcee9e9fcad60aa9f8b2d5d4 |
The inspect, stop, kill, restart, and rm subcommands can use the container ID instead of the container name.
External parameters
Some containers need or can use external parameters provided at startup. The most common approach for providing and consuming those parameters is through environment variables. Podman can inject environment variables into containers at startup by adding the -e flag to the run subcommand:
|
1 2 3 |
$ sudo podman run -e GREET=Hello -e NAME=RedHat centos:latest printenv GREET NAME Hello RedHat |
Attaching Persistent Storage to Containers
Create a directory with owner and group root:
|
1 |
$ sudo mkdir /media/db |
The user running processes in the container must be capable of writing files to the directory. If the host machine does not have exactly the same user defined, the permission should be defined with the numeric user ID (UID) from the container. In the case of the Red Hatprovided MySQL service, the UID is 27:
|
1 |
$ sudo chown -Rv 27:27 /var/db |
If you use SELinux you should apply the container_file_t context to the directory (and all subdirectories) to allow containers access to all of its contents.
|
1 |
$ sudo semanage fcontext -a -t container_file_t '/media/db(/.*)?' |
Apply the SELinux container policy that you set up in the first step to the newly created directory:
|
1 |
$ sudo restorecon -Rv /media/db |
Verify that the SELinux context type for the /var/local/mysql directory is container_file_t.
|
1 2 |
$ ls -dZ /media/db drwxr-xr-x. root root unconfined_u:object_r: container_file_t:s0 /media/db |
After creating and configuring the host directory, the next step is to mount this directory to a container. To bind mount a host directory to a container, add the -v option to the podman run command, specifying the host directory path and the container storage path, separated by a colon (:).
|
1 2 3 4 5 6 7 8 |
sudo podman run --name mariadb0 -e MYSQL_USER=user -e MYSQL_PASSWORD=mypa55 -e \ MYSQL_DATABASE=items -e MYSQL_ROOT_PASSWORD=r00tpa55 \ -p 13306:3306 -v /media/db:/var/lib/mysql:Z -d docker.io/linuxserver/mariadb a67e85bc1e7d123b1315f341d517cdf40510d6ad2ceed9590c80f5e97d0e418c $ sudo podman ps CONTAINER ID IMAGE COMMAND CREATED STATUS PORTS NAMES db849809259c docker.io/linuxserver/mariadb:latest 7 seconds ago Up 7 seconds ago 0.0.0.0:13306->3306/tcp mariadb0 |
Let’s see the logs:
|
1 2 3 4 5 6 7 8 9 10 11 12 13 14 15 16 17 18 19 20 21 22 23 24 25 26 27 28 29 30 31 32 33 34 35 36 37 38 39 40 41 42 43 44 45 46 47 48 49 50 51 52 53 54 55 56 57 58 59 60 61 62 63 64 65 66 67 68 69 70 71 72 73 74 75 76 77 78 79 80 81 82 83 84 85 86 87 88 89 90 91 92 93 94 95 96 97 98 99 100 101 102 103 |
$ sudo podman logs mariadb0 [migrations] started [migrations] no migrations found usermod: no changes ─────────────────────────────────────── ██╗ ███████╗██╗ ██████╗ ██║ ██╔════╝██║██╔═══██╗ ██║ ███████╗██║██║ ██║ ██║ ╚════██║██║██║ ██║ ███████╗███████║██║╚██████╔╝ ╚══════╝╚══════╝╚═╝ ╚═════╝ Brought to you by linuxserver.io ─────────────────────────────────────── To support LSIO projects visit: https://www.linuxserver.io/donate/ ─────────────────────────────────────── GID/UID ─────────────────────────────────────── User UID: 911 User GID: 911 ─────────────────────────────────────── Setting Up Initial Databases chown: cannot access '/auth_pam_tool_dir/auth_pam_tool': No such file or directory Couldn't set an owner to '/auth_pam_tool_dir/auth_pam_tool'. It must be root, the PAM authentication plugin doesn't work otherwise.. chown: cannot access '/auth_pam_tool_dir': No such file or directory Cannot change ownership of the '/auth_pam_tool_dir' directory to the 'abc' user. Check that you have the necessary permissions and try again. Installing MariaDB/MySQL system tables in '/config/databases' ... 2023-05-24 11:43:35 1 [Warning] Failed to load slave replication state from table mysql.gtid_slave_pos: 1017: Can't find file: './mysql/' (errno: 2 "No such file or directory") OK To start mariadbd at boot time you have to copy support-files/mariadb.service to the right place for your system PLEASE REMEMBER TO SET A PASSWORD FOR THE MariaDB root USER ! To do so, start the server, then issue the following command: '/usr/bin/mariadb-secure-installation' which will also give you the option of removing the test databases and anonymous user created by default. This is strongly recommended for production servers. See the MariaDB Knowledgebase at https://mariadb.com/kb You can start the MariaDB daemon with: cd '/usr' ; /usr/bin/mariadb-safe --datadir='/config/databases' You can test the MariaDB daemon with mysql-test-run.pl cd '/usr/mysql-test' ; perl mariadb-test-run.pl Please report any problems at https://mariadb.org/jira The latest information about MariaDB is available at https://mariadb.org/. Consider joining MariaDB's strong and vibrant community: https://mariadb.org/get-involved/ 2023-05-24 11:43:37 0 [Note] Starting MariaDB 10.6.13-MariaDB-log source revision a24f2bb50ba4a0dd4127455f7fcdfed584937f36 as process 182 2023-05-24 11:43:37 0 [Note] Using unique option prefix 'myisam_recover' is error-prone and can break in the future. Please use the full name 'myisam-recover-options' instead. 2023-05-24 11:43:37 0 [Note] InnoDB: Compressed tables use zlib 1.2.13 2023-05-24 11:43:37 0 [Note] InnoDB: Number of pools: 1 2023-05-24 11:43:37 0 [Note] InnoDB: Using SSE4.2 crc32 instructions 2023-05-24 11:43:37 0 [Note] mariadbd: O_TMPFILE is not supported on /tmp (disabling future attempts) 2023-05-24 11:43:37 0 [Note] InnoDB: Using Linux native AIO 2023-05-24 11:43:37 0 [Note] InnoDB: Initializing buffer pool, total size = 268435456, chunk size = 134217728 2023-05-24 11:43:37 0 [Note] InnoDB: Completed initialization of buffer pool 2023-05-24 11:43:37 0 [Note] InnoDB: 128 rollback segments are active. 2023-05-24 11:43:37 0 [Note] InnoDB: Creating shared tablespace for temporary tables 2023-05-24 11:43:37 0 [Note] InnoDB: Setting file './ibtmp1' size to 12 MB. Physically writing the file full; Please wait ... 2023-05-24 11:43:37 0 [Note] InnoDB: File './ibtmp1' size is now 12 MB. 2023-05-24 11:43:37 0 [Note] InnoDB: 10.6.13 started; log sequence number 42120; transaction id 14 2023-05-24 11:43:37 0 [Note] InnoDB: Loading buffer pool(s) from /config/databases/ib_buffer_pool 2023-05-24 11:43:37 0 [Note] Plugin 'FEEDBACK' is disabled. 2023-05-24 11:43:37 0 [Note] InnoDB: Buffer pool(s) load completed at 230524 11:43:37 2023-05-24 11:43:37 0 [Note] Server socket created on IP: '0.0.0.0'. 2023-05-24 11:43:37 0 [Note] Server socket created on IP: '::'. 2023-05-24 11:43:37 0 [Note] mariadbd: ready for connections. Version: '10.6.13-MariaDB-log' socket: '/var/run/mysqld/mysqld.sock' port: 3306 MariaDB Server 2023-05-24 11:43:39 0 [Note] mariadbd (initiated by: root[root] @ localhost []): Normal shutdown 2023-05-24 11:43:39 0 [Note] InnoDB: FTS optimize thread exiting. 2023-05-24 11:43:39 0 [Note] InnoDB: Starting shutdown... 2023-05-24 11:43:39 0 [Note] InnoDB: Dumping buffer pool(s) to /config/databases/ib_buffer_pool 2023-05-24 11:43:39 0 [Note] InnoDB: Buffer pool(s) dump completed at 230524 11:43:39 2023-05-24 11:43:39 0 [Note] InnoDB: Removed temporary tablespace data file: "./ibtmp1" 2023-05-24 11:43:39 0 [Note] InnoDB: Shutdown completed; log sequence number 42132; transaction id 16 2023-05-24 11:43:39 0 [Note] mariadbd: Shutdown complete Database Setup Completed [custom-init] No custom files found, skipping... 230524 11:43:40 mysqld_safe Logging to '/config/databases/db849809259c.err'. 230524 11:43:40 mysqld_safe Starting mariadbd daemon with databases from /config/databases [ls.io-init] done. |
Connect to the database:
|
1 2 3 4 5 6 7 8 9 10 |
$ mysql -u user -h 127.0.0.1 -pmypa55 -P 13306 items Welcome to the MariaDB monitor. Commands end with ; or \g. Your MariaDB connection id is 13 Server version: 10.6.13-MariaDB-log MariaDB Server Copyright (c) 2000, 2018, Oracle, MariaDB Corporation Ab and others. Type 'help;' or '\h' for help. Type '\c' to clear the current input statement. MariaDB [items]> CREATE TABLE pet (name VARCHAR(20), owner VARCHAR(20), species VARCHAR(20), sex CHAR(1), birth DATE, death DATE); |
Loading the database:
|
1 |
$ mysql -u user -h 127.0.0.1 -pmypa55 -P 13306 items < /path/to/db_file |
Open a Bash shell inside the container.
|
1 |
$ sudo podman exec -it mariadb0 /bin/bash |
Verify that the mysql command is installed in the container:
|
1 2 |
root@a67e85bc1e7d:/# which mysql /usr/bin/mysql |
Verify that the database contains data:
|
1 2 3 4 5 6 7 |
root@a67e85bc1e7d:/# mysql -u user -pmypa55 items -e "INSERT INTO pet VALUES ('Puffball','Diane','hamster','f','1999-03-30',NULL);" root@a67e85bc1e7d:/# mysql -u user -pmypa55 items -e "SELECT * FROM pet" +----------+-------+---------+------+------------+-------+ | name | owner | species | sex | birth | death | +----------+-------+---------+------+------------+-------+ | Puffball | Diane | hamster | f | 1999-03-30 | NULL | +----------+-------+---------+------+------------+-------+ |
Exit from the Bash shell inside the container:
|
1 2 |
root@a67e85bc1e7d:/# exit exit |
Inject the mysql query inside the container.
|
1 2 3 4 5 6 |
$ sudo podman exec -it mariadb0 /usr/bin/mysql -u user -pmypa55 items -e "SELECT * FROM pet" +----------+-------+---------+------+------------+-------+ | name | owner | species | sex | birth | death | +----------+-------+---------+------+------------+-------+ | Puffball | Diane | hamster | f | 1999-03-30 | NULL | +----------+-------+---------+------+------------+-------+ |
The mysql command is not in the PATH variable and, for this reason, you must use an absolute path.